與我們聯絡
與 Tek 業務代表即時對談。 上班時間:上午 6:00 - 下午 4:30 (太平洋時間)
請致電
與 Tek 業務代表即時對談。 上班時間:上午 8:30 - 下午 5:30 (太平洋時間)
下載
下載手冊、產品規格表、軟體等等:
意見回饋
Harness the Power of TSP™ Toolkit Software
Harness the Power of TSP™ Toolkit Software
Introduction
In an industry where rapid test development is crucial, the need for effective automation and easy code development has never been more pronounced. As businesses strive to enhance their quality while reducing time to market, the right tools can make all the difference. Enter Keithley TSP Toolkit, a new scripting environment that makes adopting Keithley’s Test Script Processor (TSP) language and leveraging the benefits of on-instrument scripting more straightforward than ever.
In this application note, we’ll define TSP and TSP Toolkit and share some tips and tricks to help you leverage these tools to increase your test throughput.
What is TSP?
TSP is a unique instrument automation command set and programming language. TSP-enabled instruments contain an embedded scripting engine that’s capable of executing both instrument control commands and basic programming functionality.
Each TSP-enabled instrument has a set of commands that covers the entire range of functionality for that instrument. In addition to operating like a traditional command set, TSP is also a programming language. This offers two important benefits for instrument control:
- The commands themselves mimic high-level languages like C# or Python.
- The instruments can execute simple programming structures such as for loops and while loops outside of the instrument specific command set.
With TSP for test automation, we can create a file called a TSP script that contains all or part of the test routine. The TSP script can execute sweeps and collect data without receiving commands remotely or requiring front panel configuration, because it can be run directly on the instrument. Unlike instruments that are only compatible
with SCPI, TSP-enabled instruments can store full scripts, functions or variables in their memory, allowing it to function autonomously once loaded with a script. For writing these scripts, TSP Toolkit is the obvious choice.
TSP Toolkit
TSP Toolkit is an updated script development environment taking the form of a Microsoft Visual Studio Code extension that includes instrument support for Keithley TSP-enabled instrumentation such as source measure units (SMUs), digital multimeters (DMMs) and data acquisition systems (DAQs), plus many quality-of-life features that improve the script development experience. TSP Toolkit is replacing Keithley Test Script Builder (TSB) and features all the same functionality plus more.
TSP Toolkit features the modern user interface (UI) of the Microsoft Visual Studio Code editor (VS Code), complete with syntax-highlighting for TSP to increase readability. VS Code also offers hundreds of additional extensions, so users developing with multiple programming languages can seamlessly integrate TSP script development into their workflows.
The TSP Toolkit extension also features TSP command autocompletion alongside in-line and hover help, eliminating the need to manually parse through dense reference manuals to confirm proper command usage and syntax.
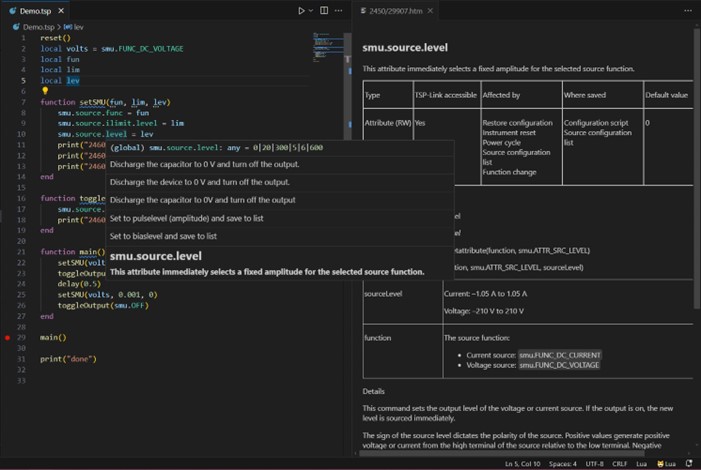
Figure 1: TSP Toolkit command hover help feature in use.
TSP Toolkit can easily connect to TSP-enabled instruments via the instrument pane, which comes equipped with instrument autodiscovery. Discovered instruments in the instrument pane can be expanded to view their model, serial number, VISA or IP address and port number.
Right-click on a discovered instrument to access firmware upgrades, the ability to rename your instrument and establish a connection to the instrument.
Upon connection, an instrument terminal launches. This terminal can function the same as any command line terminal, including the one present in Test Script Builder. You can have multiple terminals open at once, giving you the option to connect to multiple instruments at a time.
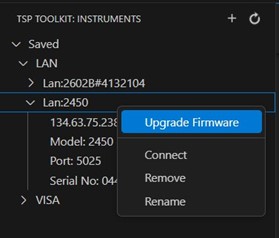
Figure 2: TSP Toolkit instrument pane context menu options.

Figure 3: TSP Toolkit instrument terminal in use.
The terminal can be used to send individual TSP commands to the instrument or even execute function calls from pre-loaded scripts. The terminal is also where any errors or queries are returned.
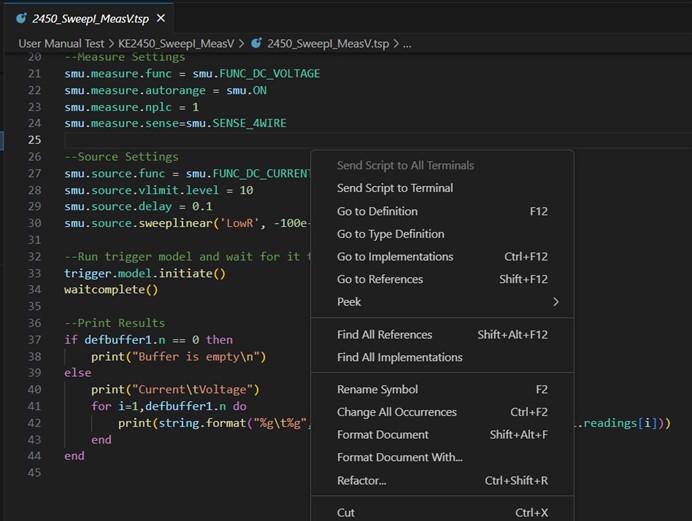
Figure 4: TSP Toolkit script editor window context menu options.
To run your script, right click anywhere within the script editor window and select “Send Script to Terminal”, or, if you have multiple connections and want the script to run on all connected instruments, select “Send Script to All Terminals.”
The script will be sent to the instrument and run directly on the box, which improves throughput by reducing the number of interactions across the bus and takes the processing burden away from the PC.
Saving Example Scripts from Test Script Builder
If you are a user of the original Keithley Test Script Builder, you know that it includes a library of example TSP scripts. TSP Toolkit enables easy migration of these scripts and those developed with TSB.
To use TSB examples in TSP Toolkit, find the TSB Workspace file on your PC and copy it to a local directory on your PC. You can find where the TSB Workspace file is stored on your computer by right clicking on any of the examples in the Navigator tab and selecting properties.

Figure 5: Keithley Test Script Builder example workspace file location.
Open this new directory in VS Code by clicking File -> Open Folder. This will give you access to all the files in the target directory via the VS Code Explorer tab.
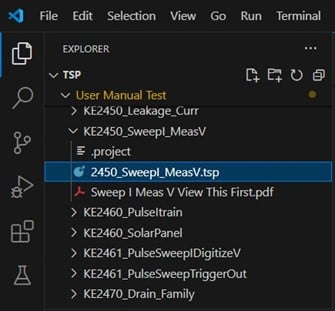
Figure 6: Microsoft Visual Studio Code explorer tab.
Example scripts are also available for download on the official Keithley GitHub.
TSP Scripting Tips & Tricks Scripting Rules
When a script is loaded into the runtime environment, a global variable with the same name as the script is created to reference the script.
- Each script must have a unique name that cannot start with a number.
- Script names must not contain spaces.
- Script names must be fewer than 27 characters long.
- If you load a new script with the same name as an existing script, an error event message is generated. You must delete the existing script before you create a new script with the same name.
- If you revise a script and save it to the instrument with a new name, the previously loaded script remains in the instrument with the original name.
- You can save scripts to nonvolatile memory in the instrument. Saving a script to nonvolatile memory allows the instrument to be turned off without losing the script.
It should be noted that these rules mainly apply to scripts that are transferred to an instrument’s memory via USB or another scripting language like Python. This is because when running scripts within TSP Toolkit, the extension takes care of many of these rules for you — but the script name character limit must still be observed.
Aliasing
If you do not like the naming conventions of traditional TSP commands or wish to abbreviate them, you can rename the commands via aliasing. TSP commands are structured in levels, separated by periods. A portion of these levels or the entire command can be stored to a variable and then the variable is used to call the command. With every level aliased, the script performance will be better, and the commands are processed faster.
TSP Toolkit Example 1: Aliasing
local dm = dmm.measure
local current = dmm.FUNC_DC_CURRENT
dm.func = current -- Alias for dmm.measure.func = dmm.FUNC_DC_CURRENT

local stop = trigger.model.abort
stop() -- Alias for trigger.model.abort()

local clear = eventlog.clear
clear() -- Alias for eventlog.clear()
This example demonstrates how to create aliases for TSP commands:
Note in the above example, that the first line is aliasing 2 levels of a command, the second line is aliasing an enum and the third line is using the aliases together to set the measure function to current.
When aliasing a function command like trigger.model.abort(), the parenthesis normally accompanied with the function is not used. However, when calling the aliased function, stop(), the parenthesis is used normally. This behavior is the same for any command that is a function.
Store & Run Scripts Locally
TSP scripts can also be saved to the instrument’s internal memory. This allows them to be accessed by any remote control scheme or even be run without a controlling PC from the instrument’s front panel.
Scripts may be sent and saved to an instrument by using the loadscript and endscript keywords. This is especially helpful when you need to automate the delivery of scripts, or when it is more practical to send scripts over an existing remote connection. Note that the use of these keywords is not required for running the script in TSP Toolkit. They are used only if you want to send the script to the instrument’s memory without executing it so that it can be saved on the instrument itself.
TSP Toolkit Example 2: Using the Loadscript and Endscript Keywords
loadscript testinfo --Send the loadscript command with a script name. This tells the instrument to start collecting messages for a script named testInfo

display.settext(display.TEXT1, "Batch 233")
display.settext(display.TEXT2, "Test Information")
display.changescreen(display.SCREEN_USER_SWIPE)

endscript --Send the command that tells the instrument that the script is complete
testInfo() --Run the script by sending the script name followed by ()
testInfo.save() --To save the script to nonvolatile memory, send the command scriptname.save()
If using TSP Toolkit, a script can be saved to the instrument without the use of the loadscript and endscript keywords. Simply open a connection to the target instrument and enter:
.script " path="" to="" scriptname.tsp"="" –save<="" strong="">
in the instrument terminal.
Another method, which is more suited for small installation bases, involves simply saving the TSP script on a USB drive. The front panel controls of TSP-enabled instruments will allow you to run the script directly from the USB drive or save the script to the instrument’s internal memory. If a script on a USB flash drive is named autoinstall.tsp, the script is automatically copied to the list of internal scripts when the drive is inserted into the instrument.
Automatic Execution Scripts
Scripts saved to USB drives or the instrument’s internal memory can be copied to start up. Scripts added to start up will automatically execute as part of the instrument’s power on sequence. Below is an example script that changes the buffer size and sets a Keithley DMM6500 6½-Digit Bench/System Digital Multimeter to measure current:
TSP Toolkit Example 3: Measuring Current When DMM is Turned On
reset() --Reset the instrument to a known state
defbuffer1.capacity = 1000 -- Change the size of the default buffer
dmm.measure.func = dmm.FUNC_DC_CURRENT -- Set the measurement function to current
dmm.measure.read() -- Take a reading
To save the script to the instrument’s power up sequence from TSP Toolkit, you can name your script autoexec.tsp and the instrument will always run the script at startup.
Application Example: Sweeping with a Keithley 2450 SourceMeter® SMU Instrument
As mentioned previously, scripts opened or developed in TSP Toolkit can be sent to the terminal to be run on a connected instrument. In Figure 7, an example script from Test Script Builder has been opened within TSP Toolkit and executed. This example, 2450_SweepI_MeasV.tsp, can be downloaded from the Keithley GitHub and instructs the 2450 SMU to output a sweep from -100 mA to 100 mA in 101 steps while measuring the resulting voltage drop across the device under test.
The resulting current and voltage readings are printed to the terminal. You can copy and paste these readings into a spreadsheet for further analysis and graphing.
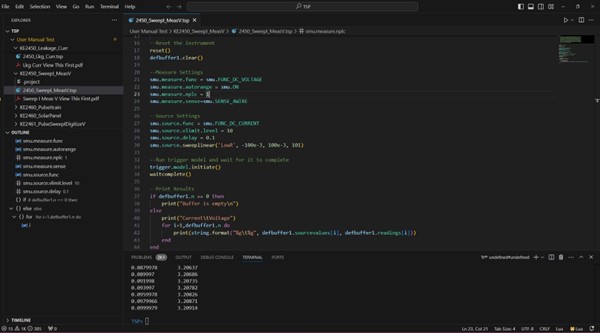
Figure 7: 2450_SweepI_MeasV.tsp example script running in TSP Toolkit.
For the purposes of this application note, this test was run on an LED with a 20 mΩ resistance. The following image is a screenshot from the 2450 front panel after the script finished executing, showing the collected data in a graph.
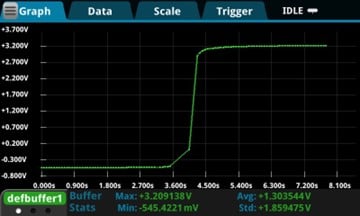
Figure 8: Resulting data shown on 2450 SMU front panel graph view.
Due to the highly extensible nature of Visual Studio Code, TSP Toolkit exists among other extensions for other programming languages. This means that you can use TSP Toolkit to write a TSP script and then run the TSP file in your Python or
other framework.
The following example is a Python script that connects to an instrument via a VISA driver and then loads the 2450_SweepI_ MeasV.tsp script onto the instrument using a for loop. Once the script has been loaded into the instrument’s memory, it can be executed on the instrument from Python using the *.run() function.
TSP Toolkit Example 3: Measuring Current When DMM is Turned On
import pyvisa as visa
rm = visa.ResourceManager()
smu_address = "TCPIP0::134.63.75.238::inst0::INSTR" smu = rm.open_resource(smu_address)
smu.timeout = 20000

file_path = "C:\\Users\\stenagli\\OneDrive - Fortive\\Documents\\Scripts\\TSP\\User Manual Test\\KE2450_SweepI_MeasV\\"
file_name = "2450_SweepI_MeasV.tsp" file_path_and_name = file_path + file_name print(file_path_and_name)

smu.write("loadscript SweepI_MeasV") with open(file_path_and_name) as fp:
for line in fp: smu.write(line)

smu.write("endscript") smu.write("SweepI_MeasV.run()") smu.close()
Conclusion
Using TSP as a powerful scripting tool can increase the overall functionality of your instruments and increase productivity by creating and running test scripts faster. Scripting gives users the option to control multiple instruments with a single program and significantly reduces communications over the bus. Fully integrating logical operations with remote commands creates a plethora of possibilities for new tests, and TSP Toolkit makes it easier than ever to get started. Visit the TSP Toolkit product page to learn more and download.

