Introduction
Welcome to Keithley's Guide to Understanding Electrical Test and Measurement. For over 60 years, Keithley testand measurement instruments have provided measurements ranging from the most basic to very complex. In all these applications, there is one common element—the best possible measurements need to be made. This library has been compiled to help you analyze your applications and the various types of bench top instruments that can solve your test and measurement needs.
Getting Back to the Basics of Electrical Measurements
Accurate measurements are central to virtually every scientific and engineering discipline, but all too often measurement science gets little attention in the undergraduate curriculum. Even those who received a thorough grounding in measurement fundamentals as undergraduates can be forgiven if they've forgotten some of the details. This white paper is intended to refresh those fading memories or to bring those who want to learn more about making good quality measurements up to speed.
But what exactly does "good quality measurement" mean? Although it can mean a variety of things, one of the most important is the ability to create a test setup that's suitable for the purpose intended. Let's start with a typical test scenario that involves measuring some characteristics of a device or material. This can range from a very simple setup, such as using a benchtop digital multimeter (DMM) to measure resistance values, to more complex systems that involve fixturing, special cabling, etc. When determining the required performance of the system, that is, the required measurement accuracies, tolerances, speed, etc., one must include not only the performance of the measurement instrument but also the limitations imposed by and the effects of the cabling, connectors, test fixture, and even the environment under which tests will be carried out
When considering a specific measurement instrument for an application, the specification or data sheet is the first place to look for information on its performance and how that will limit the results. However, data sheets are not always easy to interpret because they typically use specialized terminology
Also, one can't always determine if a piece of test equipment will meet the requirements of the application simply by looking at its specifications. For example, the characteristics of the material or device under test may have a significant impact on measurement quality. The cabling, switching hardware, and the test fixture, if required, can also affect the test results.
The Four-Step Measurement Process
The process of designing and characterizing the performance of any test setup can be broken down into a four-step process. Following this process will greatly increase the chances of building a system that meets requirements and eliminates unpleasant and expensive surprises.
Step 1 | Define the System's Required Measurement Performance
The first step, before specifying a piece of equipment, is to define the system's required measurement performance. This is an essential prerequisite to designing, building, verifying, and ultimately using a test system that will meet the application's requirements. Defining the required level of performance involves understanding the specialized terminology like resolution, accuracy, repeatability, rise time, sensitivity, and many others.
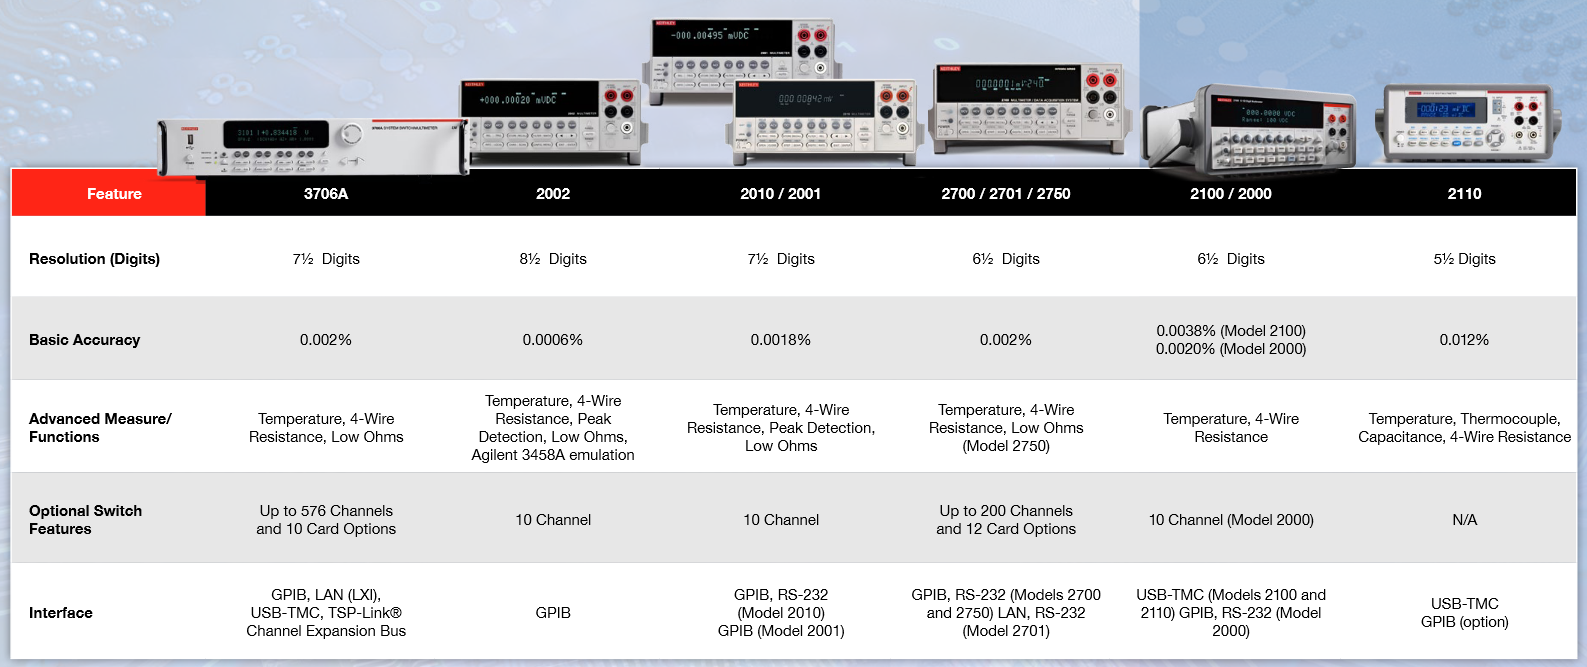
Resolution is the smallest portion of the signal that can actually be observed. It is determined by the analog-to-digital (A/D) converter in the measurement device. There are several ways to characterize resolution—bits, digits, counts, etc. The more bits or digits there are, the greater the device's resolution. The resolution of most benchtop instruments is specified in digits, such as a 6½-digit DMM. Be aware that the ½ digit terminology means that the most significant digit has less than a full range of 0 to 9. As a general rule, ½ digit implies the most significant digit can have the values 0, 1, or 2. In contrast, data acquisition boards are often specified by the number of bits their A/D converters have.
- 12-bit A/D – 4096 counts – approx. 3½ digits
- 16-bit A/D – 65,536 counts – approx. 4½ digits
- 18-bit A/D – 262,144 counts – approx. 5½ digits
- 22-bit A/D – 4,194,304 counts – approx. 6½ digits
- 25-bit A/D – 33,554,304 counts – approx. 7½ digits
- 28 bit-A/D – 268,435,456 counts – approx. 8½ digits
Although the terms sensitivity and accuracy are often considered synonymous, they do not mean the same thing. Sensitivity refers to the smallest change in the measurement that can be detected and is specified in units of the measured value, such as volts, ohms, amps, degrees, etc. The sensitivity of an instrument is equal to its lowest range divided by the resolution. Therefore, the sensitivity of a 16-bit A/D based on a 2V scale is 2 divided by 65536 or 30 microvolts. A variety of instruments are optimized for making highly sensitive measurements, including nanovoltmeters, picoammeters, electrometers, and high-resolution DMMs. Here are some examples of how to calculate the sensitivity for A/Ds of varying levels of resolution:
- 3½ digits (2000) on 2V range = 1mV
- 4½ digits (20000) on 2Ω range = 100μΩ
- 16-bit (65536) A/D on 2V range = 30μV
- 8½ digits on 200mV range = 1nV
Now that we have a better understanding of sensitivity, what do we mean when describing the accuracy of an instrument? In fact, there are two types of accuracy to consider, namely absolute accuracy and relative accuracy. Absolute accuracy indicates the closeness of agreement between the result of a measurement and its true value, as traceable to an accepted national or international standard value. Devices are typically calibrated by comparing them to a known standard value. Most countries have their own standards institute where national standards are kept. The drift of an instrument refers to its ability to retain its calibration over time. Relative accuracy refers to the extent to which a measurement accurately reflects the relationship between an unknown and a locally established reference value.
The implications of these terms are demonstrated by the challenge of ensuring the absolute accuracy of a temperature measurement of 100.00°C to ±0.01° versus measuring a change in temperature of 0.01°C. Measuring the change is far easier than ensuring absolute accuracy to this tolerance, and often, that is all that an application requires. For example, in product testing, it is often important to measure the heat rise accurately (for example, in a power supply), but it really doesn't matter if it's at exactly 25.00°C ambient.
Repeatability is the ability to measure the same input to the same value over and over again. Ideally, the repeatability of measurements should be better than the accuracy. If repeatability is high, and the sources of error are known and quantified, then high resolution and repeatable measurements are often acceptable for many applications. Such measurements may have high relative accuracy with low absolute accuracy
Step 2 | Designing the Measurement System
The next step gets into the actual process of designing the measurement system, including the selection of equipment and fixtures, etc. As mentioned previously, interpreting a data sheet to determine which specifications are relevant to a system can be daunting, so let's look at some of the most important specs included:
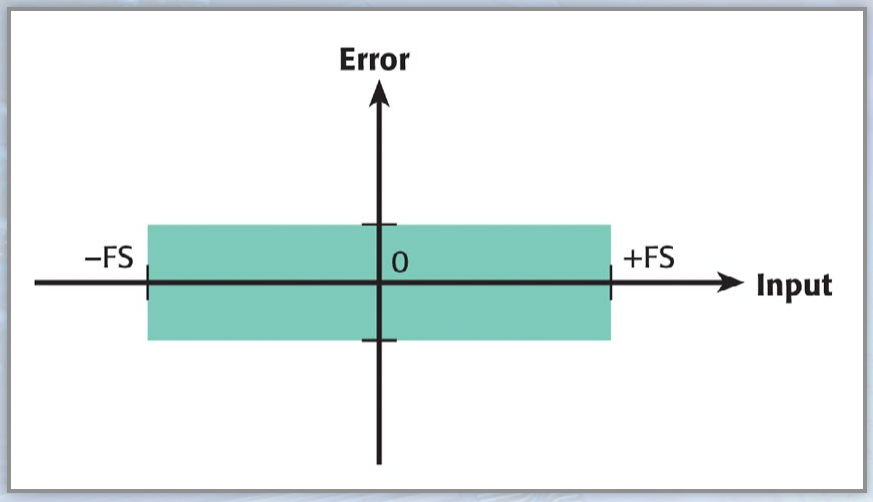
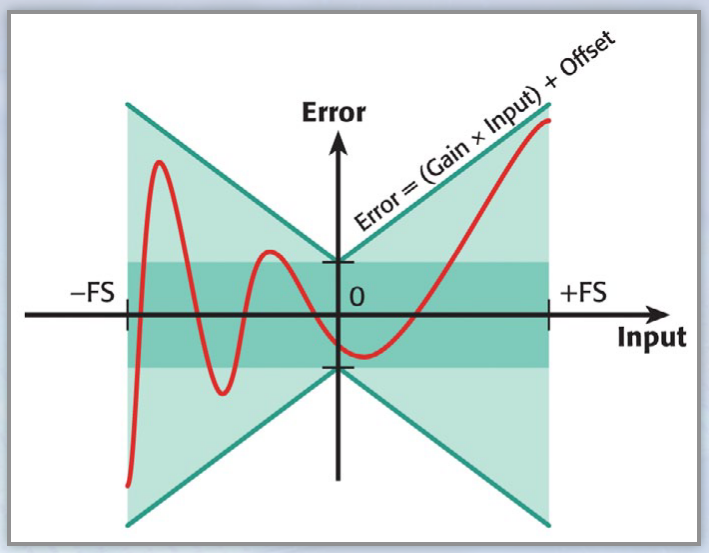
Accuracy. Keithley normally expresses its accuracy specifications in two parts, namely as a proportion of the value being measured, and a proportion of the scale that the measurement is on, for example: ± (gain error + offset error). This can be expressed as ± (% reading + % range) or ± (ppm of reading + ppm of range). The range in Figure 1 is represented by FS or "full scale." For example, the specification for Keithley's Model 2000 6½-digit multimeter, when measuring voltage on the 1V range, states an accuracy of 30ppm of the reading + 7ppm of range. The green box represents the offset error, which is expressed either as a percentage of the range or ppm of the range. Figure 2 illustrates the gain error, which is expressed either as a % of the reading or ppm of the reading. When carrying out a reading, we can expect the error to be anywhere within the purple and green areas of the graph. Accuracy specs for high-quality measurement devices can be given for 24 hours, 90 days, one year, two years, or even five years from the time of last calibration. Basic accuracy specs often assume usage within 90 days of calibration.
Temperature coefficient. Accuracy specs are normally guaranteed within a specific temperature range; for example, the Model 2000 DMM's guaranteed range is 23ºC, ±5ºC. If carrying out measurements in an environment where temperatures are outside of this range, it's necessary to add a temperature-related error. This becomes especially difficult if the ambient temperatures vary considerably.
Instrumentation error. Some measurement errors are a result of the instrument itself. As we have already discussed , instrument error or accuracy specifications always require two components: a proportion of the measured value, sometimes called gain error, and an offset value specified as a portion of full range. Let's look at the different instrument specifications for measuring the same value. In this example, we are trying to measure 0.5V on the 2V range, using a lesser quality DMM. Using the specifications, we can see that the uncertainty, or accuracy, will be ± 350μV. In abbreviated specs, frequently only the gain error is provided. The offset error, however, may be the most significant factor when measuring values at the low end of the range.
| Accuracy | = ±(% reading + % range) = ±(gain error + offset error) |
| For example, DMM 2V range: | |
| Accuracy | = ±(0.03% of reading + 0.01% range) |
| For a 0.5V input: | |
| Uncertainty | = ±(0.03% × 0.5V + 0.01% × 2.0V) = ±(0.00015V + 0.00020V) = ±350μV |
| Reading | = 0.49965 to 0.50035 |
In the next example, we have the same scenario, i.e., trying to measure 0.5V using the 2V range, but we are now using a better quality DMM. The example has better specifications on the 2V range, and the uncertainty is now just ±35μV
| DMM, 6½-digit, 2V range (2.000000) | |
| Accuracy | = ±(0.003% reading + 0.001% range) = ±(30ppm readings + 10ppm range) = ±(0.003% reading + 20 counts) |
| Uncertainty @ 0.5V | = ±(0.000015 + 0.000020) = ±0.000035V = ±35μV |
Now if we look at performing the same measurement using a data acquisition board, note that 1 LSB offset error is range/4096 = 0.024% of range. On a 2V range, 1 LSB offset error is 0.488 millivolt. Note that the measurement accuracy is much poorer with this data acquisition card than when using the higher quality benchtop DMM.
| Analog input board, 12 bit, 2V range | |
| Accuracy | = ±(0.01% reading + 1 LSB) = ±(100ppm + 1 bit) |
| Uncertainty @ 0.5V | = ±(0.000050 + (2.0/4096)) = ±(0.000050 + 0.000488) = ±0.000538 = ±538μV |
Sensitivity. Sensitivity, the smallest observable change that can be detected by the instrument, may be limited either by noise or by the instrument's digital resolution. The level of instrument noise is often specified as a peak-to-peak or RMS value, sometimes within a certain bandwidth. It is important that the sensitivity figures from the data sheet will meet your requirements, but also consider the noise figures as these will especially affect low level measurements.
Timing. What does the timing within a test setup mean? Obviously, an automated PC-controlled measurement setup allows making measurements far more quickly than manual testing. This is especially useful in a manufacturing environment, or where many measurements are required. However, it's critical to ensure that measurements are taken when the equipment has "settled" because there is always a tradeoff between the speed with which a measurement is made and its quality. The rise time of an analog instrument (or analog output) is generally defined as the time necessary for the output to rise from 10% to 90% of the final value when the input signal rises instantaneously from zero to some fixed value. Rise time affects the accuracy of the measurement when it's of the same order of magnitude as the period of the measurement. If the length of time allowed before taking the reading is equal to the rise time, an error of approximately 10% will result, because the signal will have reached only 90% of its final value. To reduce the error, more time must be allowed. To reduce the error to 1%, about two rise times must be allowed, while reducing the error to 0.1% would require roughly three rise times (or nearly seven time constants).
Step 3 | Building and Verifying the Test System
This step addresses building the test system and verifying its performance, including a number of techniques that can be used to improve measurement quality.
Once a system builder has picked appropriate equipment, cables, and fixtures, and established that the equipment's specifications can meet the requirements, it's time to assemble it and verify its performance once step at a time. It is essential to check that each piece of test equipment has been calibrated within its specified calibration period, which is usually one year. If the instrument will be used for making voltage measurements, placing a short across the inputs of the meter will provide an indication of any offset errors. This can be directly compared to the specifications from the data sheet. If the instrument will be used for current measurements, then checking to see the current level with the ammeter open circuit will give an indication of offset current. Again, this can be directly compared to the specifications from the data sheet. Next, include the system cabling and repeat the tests, followed by the test fixture, then the device under test (DUT), repeating the tests after each addition. If the performance of the system does not meet the application's requirements, this "one step at a time" approach should help identify what is causing the problems.
Then, check the system timing to ensure there are sufficient delays to allow for settling time, and reassess it to make sure it satisfies the application's speed goals. Insufficient delay times between measurements can often create accuracy and repeatability problems. In fact, this is among the most common sources of error in test systems, and it's especially evident when running the test at speed produces a different result than when performing the test step by step or manually.
Although inductance can affect settling times, capacitance in the system is a more common problem. In a manual system, a delay of 0.25 to 0.5 seconds will seem to be instantaneous. But in an automated test system, steps are typically executed in a millisecond or less, and even the simplest systems may require delays of five to ten milliseconds after a change in stimulus to get accurate results.
Large systems with lots of cabling (and therefore, lots of cable capacitance, and/or those that measure high impedances (τ = RC) may require even longer delays or special techniques like guarding. Coaxial cable typically has capacitance in the range of 30pF per foot. The common solution is to provide sufficient delays in the measurement process to allow bfor settling. Delays of several milliseconds are commonly needed, but some applications may require even longer delays. To address this need, most Keithley instruments include a programmable trigger delay
Guarding is one technique for dealing with capacitance issues, reducing leakage errors and decreasing response time. Guarding consists of a conductor driven by a low impedance source surrounding the lead of a high impedance signal. The guard voltage is kept at or near the potential of the signal voltage.
Leading Sources of Measurement Error
Although all systems are unique, the following sources of error are among the most common:
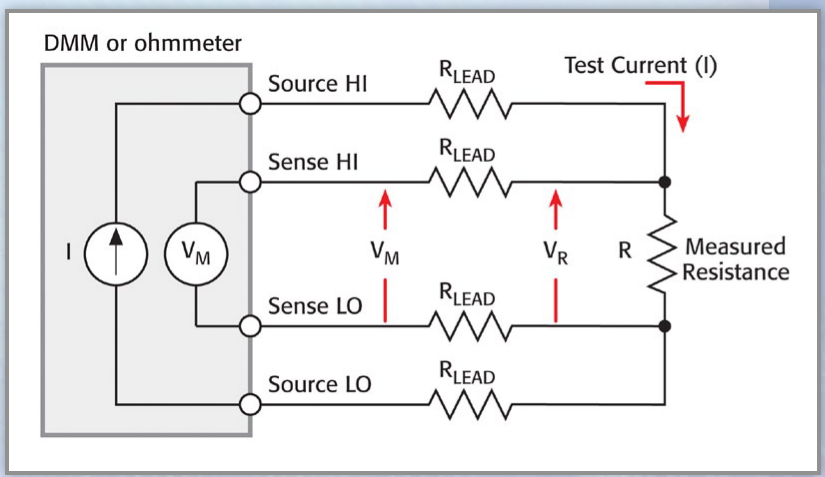
Lead resistance. For resistance measurements, especially at lower resistances, it is important to take into account the resistance of the test leads. In the example shown in Figure 3a, the two-wire ohms method is being used to determine the resistance. A current source in the meter outputs a known and stable current, and the voltage drop is measured within the meter. This method works well if the resistance to be measured is very much greater than the lead resistance. However, what if the resistance to be measured is much closer to the lead resistance or even less? Using four-wire measurements (Figure 3b) will eliminate this problem. The voltage drop is now measured across the resistor, instead of across the resistor and leads. The input resistance of the voltmeter tends to be very high in comparison to the resistance to be measured; therefore, the lead resistances on the voltmeter path can be ignored. If, however, the resistance to be measured is very high, and approaching the resistance of the voltmeter, then an electrometer or specialized meter with extremely high input resistance may be required.

Thermoelectric EMFs in connections. In any measurement system, any connections made that are of dissimilar metals will produce a thermocouple. A thermocouple is essentially a device of two dissimilar metals that generates a voltage that varies with temperature. These qualities can be put to good use when using thermocouples to monitor temperature, but in standard test system, they result in the introduction of unwanted voltages. As temperatures vary, so does the magnitude of the unwanted voltages. Table 1 lists some examples of the types of voltages that can be generated. Even when connecting copper to copper, there are typically enough differences in the composition of the two pieces of metal that voltages will be generated. If the magnitude of these errors is significant in comparison to the value to be measured, the offset compensated ohms technique can help eliminate the effect.
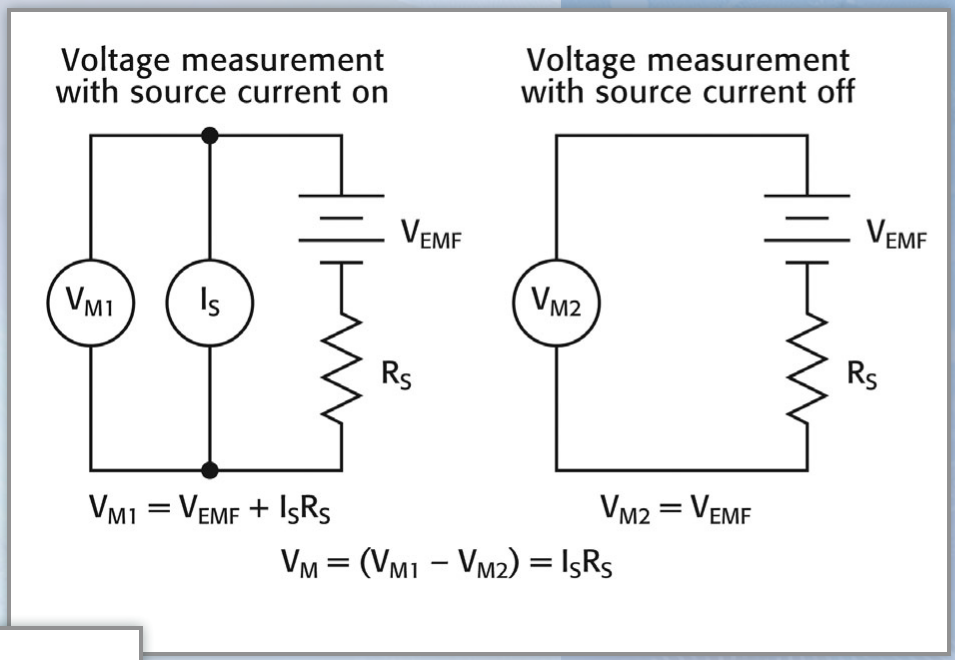
This offset-compensated ohms technique is built into many Keithley instruments. When this feature is enabled, the measurement cycle now consists of two parts (Figure 4): the first part is measuring the voltage with stimulus current switched on, the second part is to measure it with the stimulus current switched off. Subtracting the latter from the former will subtract out the errors due to thermoelectric EMFs. Therefore, this technique will effectively eliminate accuracy issues due to temperature drift.

External interference. External interference introduces both AC and DC errors into signal measurements. The most common form of external noise "pick-up" is 50Hz or 60Hz line pick-up, depending on where in the world the measurements are being made. Picking up millivolts of noise is not uncommon, especially when measurements are made near fluorescent lights. The signal components of noise superimposed on a DC signal being measured may result in highly inaccurate and fluctuating measurements. As shown in Figure 5, the measured value will very much depend on where the measurement is carried out in relation to the sine wave. Many modern instruments allow users to set the integration period in relation to the number of power line cycles. In other words, a setting of 1 NPLC will result in the measurement being integrated for 20 milliseconds (if 50Hz) and 16.67milliseconds (if 60Hz), which will eliminate any mains generated noise. The performance improvements this feature make possible are often dramatic.
Step 4 | Regular Calibration
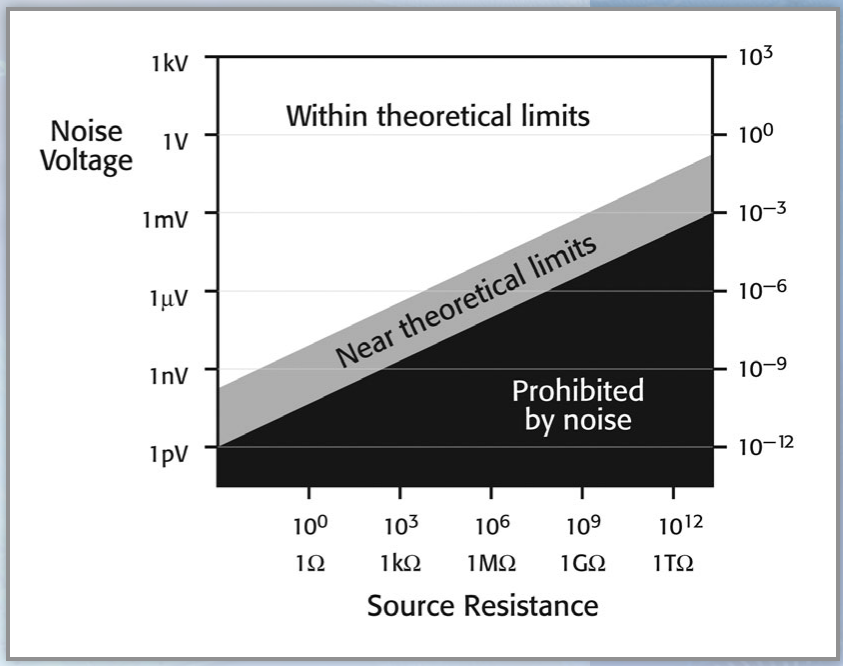
Theoretical measurement limits. The laws of physics provide a fundamental limit of how low a signal can be resolved because every system will generate some level of voltage and current noise. Figure 6 identifies the levels of voltage that are impossible to measure, as well as the levels approaching the theoretical limits of voltage measurement.
Step 4
Once the test system has been built and verified, it's ready to begin making measurements in which users can have confidence. However, it's important to recheck the performance of any test setup on a regular basis. Because of component drift, the accuracy of an instrument will vary over time, so ensure that the instrumentation is calibrated regularly.
Instrument Options
Design Considerations for Maximizing Throughput and Accuracy in Switch/Measure Instrumentation

DMM and relay-based switching are the key building blocks for many test applications and the core elements of many ATE systems. Here we look at the speed vs. accuracy trade-offs involved in making multi-channel measurements with a digital multimeter (DMM) and relay switching in addition to the practical considerations involved in selecting the right type of DMM and switching hardware and best practices to optimize throughput.
Cables
Make Faster, Easier Prober Connections and Prevent Time-consuming Measurement Errors
Need More Measurement Flexibility? Maybe You Need More Flexible Cabling
Data Acquisition with Ethernet
Instrument-Grade Data Acquisition via Ethernet
IVI Drivers
Using MATLAB® Software with Keithley Instruments through IVI Instrument Drivers
LXI
Combining the Benefits of LXI and Scripting
Exploring LXI's Advanced Capabilities
Pulse
Getting More Out of Today's Pulse/Pattern Generators
Introducing Pulsing into Reliability Tests for Advanced CMOS Technologies
Pulse Testing for Nanoscale Devices
Pulsed Characterization of Charge-trapping Behavior in High-ĸ Gate Dielectrics
Pulsers Answer Emerging Testing Challenges
Ultra-Fast I-V Applications for the Model 4225-PMU Ultra-Fast I-V Module
SCPI
SRQ
Using SRQ for Instrument Control over GPIB Bus
Switching
Current Switching Demands Special Attention to Ensure Test System Accuracy
Design Considerations for Maximizing Throughput and Accuracy in Switch/Measure Instrumentation
Optimizing Switched Measurements with the Series 3700 System Switch/Multimeter and Series 2600 System SourceMeter Instruments Through the Use of TSP
Optimizing Switch/Read Rates with Keithley Series 2000 DMMs and 7001/7002 Switch Systems
Switching in Multipoint Testing
Test Sequencer
Built-in Sequencer Accelerates Testing
New Test Sequencing Instruments Lower Cost of Test for Device Manufacturers
Shaving Milliseconds Off of Test Time
Test Script Processor (TSP® )Technology
Embedded Script Processors and Embedded Software Rank among the Most Significant T&M Instrument Design Trends of the Last Decade
Applications
Production Testing of High Intensity, Visible LEDs using the Series 2600 System SourceMeter Instruments

Due to their long life and high reliability, visible light emitting diodes (LEDs) are finding their way into more and more applications. There is an ever-increasing need for cost-effective testing methods to ensure the reliability of the LED. This application note illustrates methods and issues related to creating production test system solutions that verify the performance of single and multiple (array) LED devices.
Accelerated Stress Testing: HALT/HASS Testing
Burn-in Testing Techniques for Switching Power Supplies
Fundamentals of HALT/HASS Testing
Making AST/Burn-in Testing More Productive with Ethernet-based Instruments
Audio Analysis
Achieving Quality Audio Tests for Mobile Phones
The Basics of Through-the-Air Audio Quality Test System Characterization
Automotive Electrical Systems
Switch to 42 Volt Automotive Systems Brings Challenges and Opportunities
Charge-Pumping Measurements
Performing Charge Pumping Measurements with the Model 4200-SCS Semiconductor Characterization System
Charge-Trapping Measurements
Qualifying High к Gate Materials with Charge-Trapping Measuremen
CMOS Devices
I,sub>DDQTesting and Standby Current Testing with Series 2600 System SourceMeter Instruments
On-The-Fly VTH Measurement for Bias Temperature Instability Characterization
System SourceMeter® SMU Instruments

Digital Multimeter Selector Guide
