Introduction
Through decades of changes and advancements in HDD technology, the designer’s objective has remained essentially the same: to constantly increase capacity and speed. Today’s hard disk drives, even the commodity units designed for consumer desktop PCs, have orders of magnitude more data storage capacity than their predecessors. And they Read and Write information more quickly than ever. Rotational speeds are up, I/O data rates are up, data capacity is up.
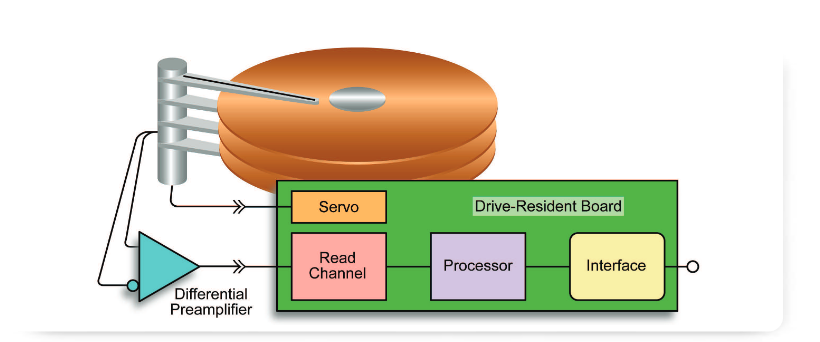
Storage system designers are confronted with the challenge of developing HDD Read channels that can reliably regenerate data with vanishingly low error rates—just a few parts per billion or better. This means developing high-speed, low-noise circuits such as preamplifiers with the analog performance needed to propagate tiny voltages and currents accurately. The pressure for HDD advancement continues. Emerging HDD standards will demand Read channel architectures with:
– Bandwidth sufficient to handle data rates of 2.2 Gb/s, 2.5 Gb/s and soon, 3.0 Gb/s
– The ability to accept and amplify head output voltages in the 10 mV range while distinguishing between valid data states and signal aberrations
– Ultra-low noise
– Minimal self-induced jitter and high tolerance for jitter from other sources
Since the Read channel is essentially a receiver for signals from the disks and heads and actual disk data is rarely available early in the design process, validation and debug steps require a surrogate signal. This signal must come from a source with controllable timing, amplitude, and waveform characteristics.
This application note will describe how to use an oscilloscope and an arbitrary waveform generator (AWG) to support the design of Read channel circuits.
The oscilloscope is the cornerstone of dynamic signal acquisition in thousands of applications, including disk drive design and test. The latest digitizing oscilloscopes deliver the sample rate, bandwidth, and precision to handle the most demanding HDD measurement applications.
The AWG, more than any other available instrument, is capable of delivering accurate simulations of real-world signals, with or without aberrations. Similarly, it can produce mathematically ideal signals for compliance testing. As the design nears completion, the AWG can even provide entire sectors’ worth of simulated disk data. Virtually every signal parameter, including noise and jitter, is programmable.
An AWG paired with a suitable oscilloscope and probes is the preferred measurement toolset for HDD design. In this application note we will describe how these tools are used individually and together to validate and troubleshoot key HDD system elements.
Heads And Media
Due to the trend toward increasing HDD capacity described earlier, drive heads are forced to read more complex signals. There are several prevailing technological solutions for this challenge, including Magneto-resistive (MR) heads, Partial Response Maximum Likelihood (PRML) data encoding, and other data encoding techniques such as Multi-Level Decision Feedback Equalization (MxDFE).
MR heads are extremely sensitive to magnetic fields, enabling them to Read the small voltage variations induced into the heads by passing over the small magnetic variations of the media. In fact, it’s partly due to the development of MR heads that drive designers have had to decrease magnetic strength to avoid signal interference. Since weaker magnetic fields do not conflict with each other as much, bits can be placed closer together, allowing higher densities.
PRML a method of detecting data on a disk and making a determination as to the correctness of the bits can handle the closely aligned signals of today’s disks without reducing the signal-to-noise ratio. When combined with MR technology, drives are able to read and write faster. This, of course, makes head and media analysis even more challenging.
Arbitrary Waveform Generator Supplies “Missing” Signals and More
Virtually every electronic device that has an input requires specific input signal formats to do its job. Today’s concurrent design methods mean that some part of a new system design may emerge before its input source the previous element in the system—is operational. A surrogate source is needed to deliver the missing signals. In many cases it is also useful to add noise or other anomalies to the signals to test the new device in a range of stress conditions.
A common approach is to create the needed signals using software applications or simply capture a live signal with a compatible oscilloscope. The resulting waveform, whether created or captured, is loaded into an arbitrary waveform generator for instant recall.
The AWG can replicate this signal repeatedly to test the final circuit design in a controlled environment such as a temperature chamber or EMC testing rooms. Since replicated signals can be easily modified, they allow control over the testing to verify the reliability of the device under test.
Typical Design Challenges
Media manufacturers typically sputter a ferrous magnetic medium onto an aluminum substrate. A key concern is how evenly this medium is deposited and whether or not there are any gaps or flaws in it. When the ferrous material is deposited unevenly, thicker in some areas than in others, it creates a greater likelihood of collision with the Read/Write head. Further, it may not accept magnetization in the areas with insufficient deposition of the magnetic medium.
Testing of the medium typically involves placing a continuous tone on all tracks, then analyzing variations in the Read signal.
Drive head manufacturers are concerned with the physical characteristics of the head, specifically size, weight, balance, shape; and of course its ability to sense data on the disk’s magnetic medium. Because these Read and Write heads are so small, it’s difficult to manufacture them with perfectly balanced characteristics. So makers of MR heads are always concerned with head asymmetries that can cause baseline shifts in Read signals.
Connecting to Low-level Differential Signals
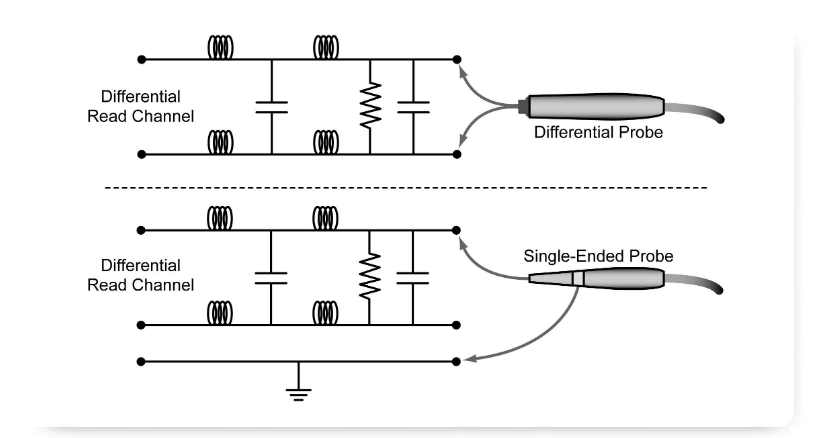
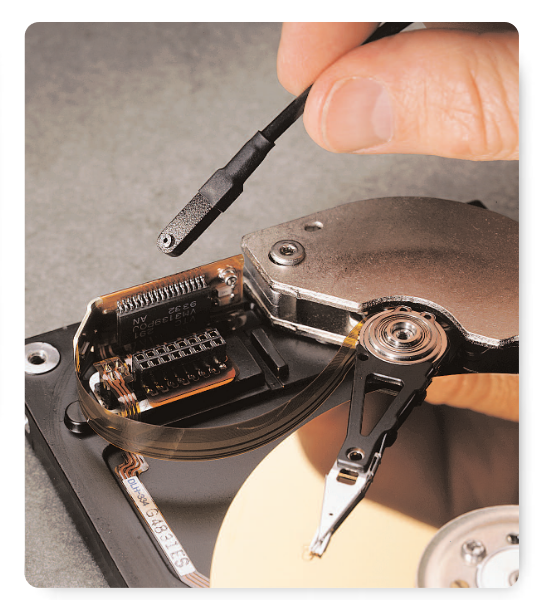
Being a magnetic interface, everything that’s written onto or read from the medium is done differentially. Therefore, a differential probe is the right tool for measuring the microvolt-level signals produced at the head as well as the millivolt-level signals after the Read channel preamplifier (Figure 2).
High-performance active differential probes can provide up to 1000:1 rejection ratios for high frequency common-mode signals. This enables disk drive designers to make time or frequency domain measurements on the high bandwidth signals found in disk drive Read channel circuits.
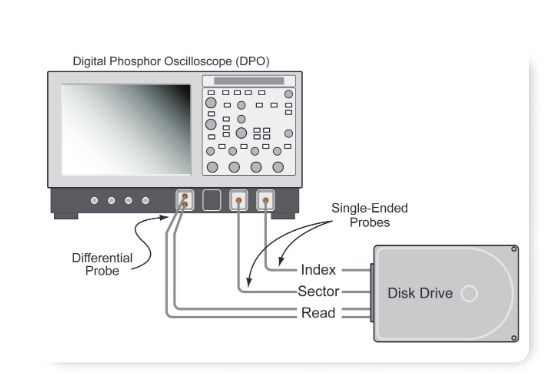
Figure 3 shows a basic test setup for disk drive measurements using a digital phosphor oscilloscope and an active differential probe. In this setup, Channel 4 is connected to the index pulse, which marks the beginning of the track. Channel 3 is connected to the sector pulse, which marks the beginning of each sector on the track. Channel 2 is connected to the Read Gate signal (this connection is optional and therefore not shown); and Channel 1 is connected to the actual data signal from the Read channel amplifier.
Digital Phosphor Oscilloscopes
A Digital Phosphor Oscilloscope (DPO) has the unique ability to display, store, and analyze complex signals in real time, using three dimensions of signal information: amplitude, time, and the distribution of amplitude over time. The first two dimensions are, of course, common to every oscilloscope, but the latter variable is an innovation that speeds signal analysis.
Like all digitizing oscilloscopes, the DPO screen is essentially a matrix of points that traces the signal waveform. But uniquely, the DPO intensifies its waveform trace in proportion to the frequency with which particular points are crossed by the signal. This intensification is mapped to a range of colors that makes it easy to distinguish the “normal” path of the waveform from less-frequent glitches and aberrations. Moreover, the DPO’s waveform capture rate far surpasses that of other digitizing oscilloscopes, maximizing the likelihood of capturing transient details.
Digital phosphor oscilloscopes provide disk drive designers with the ability to preserve the fine signal detail of disk drive waveforms while allowing them to see entire sectors or multiple sectors of a disk drive waveform without aliasing.
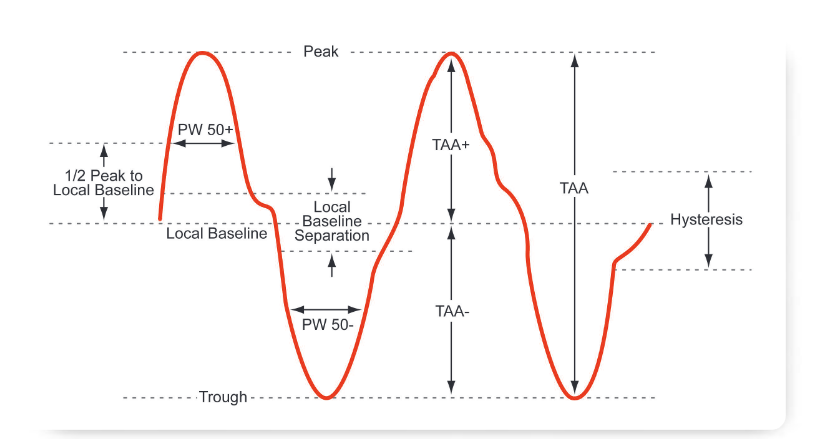

Figures 4a and 4b show a data signal from a disk drive with typical disk drive measurement parameters amplitude and timing, respectively.
Parameters for Disk Drive Measurements
For the high-speed disk measurements described in this application note, the acquisition tool of choice is a digital phosphor oscilloscope (DPO). Numerous DPO configurations are available from Tektronix, offering true analog bandwidths exceeding 7 GHz and record lengths up to 64 million sample points (1 channel active) or 16 million points on each of four active channels. Amplitude resolution is 8 bits in Normal mode; 11 bits with averaging; and 13 bits in the Hi-Res mode. These performance characteristics are more than sufficient for HDD measurements today and in the future.
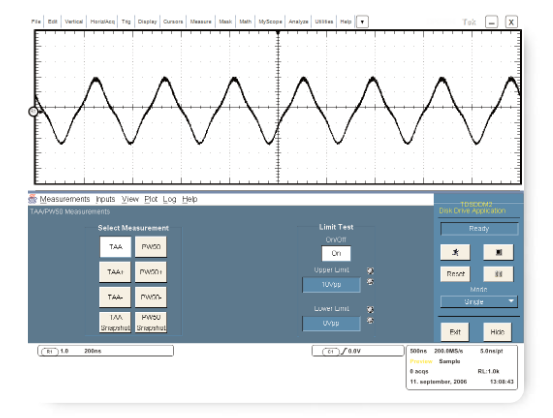
Equally important, the DPO can be equipped with disk drive measurement (DDM) software, including a powerful dedicated application from Tektronix (Figure 5). This provides a comprehensive suite of automated measurements specifically for disk drive design and characterization. The package includes a host of International Disk Drive Equipment and Materials Association (IDEMA) standardized measurements:
Standard Measurements
– Track average amplitude positive (TAA+)
– Track average amplitude negative (TAA–)
– Track average amplitude total (TAA)
– 50% pulse width positive (PW50+)
– 50% pulse width negative (PW50–)
– 50% pulse width (PW50)
– Overwrite
– Resolution
Timing Measurements
– Time – trough-to-peak
– Time – peak-to-trough
PRML Measurements
– Auto-correlation
– Non-linear transition shift
– Signal-to-noise ratio
Voltage and time asymmetry measurements are available for MR head designers, and measurement statistics are also available.
When coupled with the dual time bases and a delay-byevents counter of a suitable DPO of the type available from Tektronix, the DDM application package can control the trigger system so that it sequences from sector to sector, acquiring only the data signals on each sector and ignoring the preamble and servo signals. This capability is especially useful for TAA and PW50 measurements since it eliminates the need to record an entire revolution and then parse out the correct information mathematically. It also reduces the need to rely on extremely long acquisitions that unnecessarily consume the instrument’s record length.
Timing Asymmetry
Note: this discussion and those that follow assume that a disk drive measurement application package is being used to perform the tests.
The timing asymmetry test measures the ability of the head/media combination to process positive and negative transitions identically. To perform this test, a constant-frequency sequence is written onto a track. Asymmetry is calculated based on timing between pulse peaks as follows:

where:
– i indexes negative pulses
– N is the number of measured time intervals
– T1 is the time between the prior (positive) and the current pulse
– TS is the time between the current and the next (positive) pulse
These measurements operate as do several other measurements; the range of sectors is defined and the measurement average and standard deviation values are calculated. The amount of acquired data measured within each sector is determined by the cursors.
Overwrite
The purpose of the Overwrite test is to determine the amount of residual signal remaining from the previous Write after new data is written over it. The amount of residual depends on the coercivity of the medium, Write current amplitude, and the saturation characteristics of the head. The basic procedure is as follows:
- Erase the test track
- Write data for one revolution at a low rate, f1
- Measure the RMS amplitude (Vo) through a narrow-band filter tuned to f1
- Overwrite the track with data at a higher frequency, f2
- Measure residual RMS amplitude (Vr) at f1 again
Overwrite is expressed in mathematical terms as follows:

Asperity Test
When the head physically contacts an aberration in the surface of the media (an occurrence that is not uncommon, since the magnetic heads ride just a few tens of nanometers above the disks) a large voltage spike results. The asperity test identifies these voltage spikes as thermal asperities, indicating whether the head has hit a flaw in the media surface.
The asperity test compares every peak-to-trough pair against a threshold limit defined by the user. If the signal goes above the positive threshold level or below the negative threshold level, an asperity is assumed. The TDSDDM2 software records the sector number and the time position of the asperity from the start of the data segment gated into the measurement. The asperity test will not be rearmed for another asperity until the signal crosses zero.
The total number of events checked appears in the display. An event is one positive peak followed by one negative peak. The sector number and time position of the last 10 asperities is also displayed.
A Note On Hysteresis
Many disk drive measurements require a search for a local event called a peak-and-trough pair. It is important to set the hysteresis level of the measurement software so that noise will not cause false identification of peaks in the Read channel waveform. For a peak or trough to be captured, the signal must be greater than the hysteresis level. Hysteresis is a global setting used in making measurements such as TAA, PW50, time asymmetry, and time between peaks.
Preamplifier and Read/Write Electronics
As we move from testing the Read/Write heads and the media to testing the internal disk drive electronics, we move from component to system level testing. While many of the measurements remain the same, we now are in an environment that includes other factors, such as noise from the commutating motor and/or from the digital electronics.
Like testing of the drive head and media, analysis of the preamplifier and Read/Write electronics involves probing of differentially sourced low-level signals. In addition, preamplifier and Read/Write circuit characterization requires analysis of signals in the presence of noise and jitter, discriminating and capturing data errors, and evaluating both time and frequency domain responses.
Differential Probes and High Frequency CMRR
Testing considerations begin at the probe tip because measurement results are only as good as the signal received from the probe. When dealing with differentially sourced signals, it is essential to use a probe with high common-mode rejection ratio (CMRR). CMRR is a measure of how well a differential amplifier rejects signals common to both inputs. It is defined as the ratio of the differential gain to the common-mode gain. In general, CMRR decreases with increasing frequency.
The differential characteristics of the Read/Write channels of disk drives place special demands on differential probes. While many engineers use differential probes to reject line frequency noise, Read channel engineers are more concerned about high frequency common-mode noise from such sources as commutating motor control circuits and digital logic. Thus the high frequency CMRR performance of the probe is a key measure of its usability.
When making differential measurements, bandwidth may not be the probe’s limiting factor. In Read channel measurements, for example, differential probe bandwidth without commensurate CMRR performance is of little value. In HDD measurements on 5 volt Read channel designs, the probe’s CMRR performance should be at least 5000:1 at 1 MHz when AC-coupled. Various solutions offering this level of performance are available. AC coupling should always be used to obtain the probe’s highest sensitivity without exceeding its common-mode voltage range.
Accurately measuring Read channel signals in singlevoltage designs is more challenging because the Read channel and the digital logic share the same voltage supply and ground return path.
Reading and Writing Head Currents
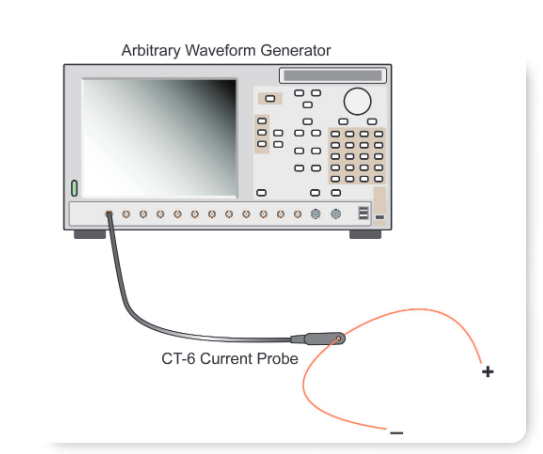
Verifying Write head current amplitudes can be as simple as looping a head lead through a current probe. A typical high-performance current probe for an oscilloscope is in reality a sensitive transformer that generates 5 millivolts per milliamp into a 50-ohm load. The result is a current waveform on the oscilloscope screen. Of course, current transformers don’t have DC response, so it is impossible to monitor DC erase currents using this tool.
A clever application of current transformers is to use them in reverse, as in Figure 6. Using an arbitrary waveform generator with 50-ohm source impedance, the current transformer can be driven to induce a current into a wire looped through it. By this means the Read channel front-end can be inductively coupled to make frequency response measurements.
Active Probes: Handle With Care
Active probes generally use very sensitive FET input buffer amplifiers located in the probe tip to provide high sensitivity and minimal loading to the device under test. Unlike conventional passive probes, which are resistive dividers, such FET input probes can be destroyed by a brief encounter with static discharges. For such probes, it’s a good idea to take a few seconds to verify voltage levels with a conventional probe before using an active FET probe. Some modern differential probes are designed to be resistant to electrostatic discharge, but these valuable tools should always be handled with care.
This means that the high-frequency CMRR performance of the differential probe must be carefully evaluated.For 5 V-only designs, use the differential probe in DCcoupled mode and achieve a CMRR of at least 1000:1.
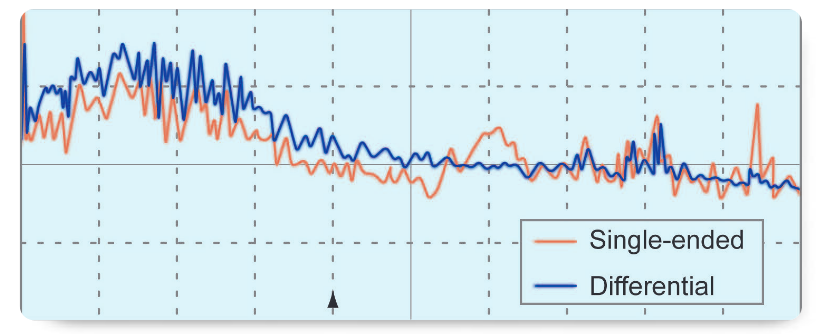
Figure 7 illustrates the effect of differential probing on noise and signal accuracy when measuring Read channel signals. This view is a frequency domain plot whose X axis expresses 12.5 MHz per division. The Y axis expresses 20 dB per vertical division.
The red trace in Figure 7 shows the result when a single-ended ground-referenced probe is AC-coupled to measure one side of the Read channel after the head preamp. The blue trace depicts the results obtained when a DC coupled to a differential probe measures the same point in the Read channel. Compare the two traces. The differential measurement is generally cleaner, particularly in the critical area above 50 MHz (noted by the black arrow marker). The differentially-probed trace more accurately represents the signal.
Split, Noisy, and Quiet Grounds
Another application requiring differential probing is the analysis of separate ground returns for analog, digital, or motor circuitry. Noisy motor drive and digital logic circuits must coexist with sub-millivolt Read channel circuits. Isolating power return paths is a popular technique for keeping switching noise out of the Read-channel.
It can be difficult to measure the effectiveness of this approach with conventional probing techniques because the user must select a reference point for a probe with a ground lead. If the ground lead is connected to any ground point on the drive, a return path is created to the oscilloscope that parallels the drive’s return path(s) to the power supply. The result can be a confusing network of grounds, each at a different potential, with variations of tens of millivolts for typical drive configurations. This defeats the integrity of differential ground measurements.
The solution is to use a true differential probe which measures the voltage between any two probed points, irrespective of their potential. This is different from trying to force one side of a differential voltage to be at the scope’s ground lead potential. The task calls for an active differential probe that measures true differential voltages, such as those between ground nodes in a drive, with millivolt-per-division resolution. The probe presents a balanced high-impedance load to the two measured nodes. This is critical when split-path layout techniques must be accurately characterized and verified.
Accurately Simulating Read Channel Signals with an Arbitrary Waveform Generator
As the performance criteria for successive hard drive designs become more stringent, it’s important for designers to simulate precisely controlled disk drive test patterns and signals. Such waveforms are required to evaluate Read channel performance and provide accurate margin testing. Designers need a very stable, controlled, and accurate signal source against which to reference their designs. The preferred tool is the arbitrary waveform generator (AWG), which can simulate many different signals: jitter effects on the device-undertest, amplifier noise, sample clock jitter, quantization error, interpolation error simulations, and more.
The AWG provides more than just precisely defined signal timing and amplitude. It can source deliberately impaired signals as well as the industry standard pulses and data streams used for compliance testing. Impairments range from inter-symbol interference to peak shift and jitter. Equally important, the leading AWG platforms offer edge timing control with resolution in the picosecond range.
Through the powerful graphical interface, the Tektronix AWGs provide a suite of tools that allows the user to define and edit a region where a violation is to occur. Timing violations can easily be simulated using the unique Shift function, which allows positioning of pulses in time with picosecond-level resolution. These capabilities are useful to emulate such waveform impairments as inter-symbol interference, peak shift, and jitter.
The Tektronix AWG Series also has the ability to generate a pulse response and provide waveforms for testing. The AWG simulates Write-current transition pulse responses with up to 10 bits of resolution. Optionally, the user may choose to download the desired response shape from a software simulation tool such as MATLAB.
In addition, the Tektronix AWGs can model several different Write-current data patterns. Typically this involves using an external simulation tool whose output data is loaded into the AWG. With the push of a button the pulse response of a simulated Write current signal is generated.
Read channel designs must overcome noise in the Read-back signal. The AWG can be used to simulate the Read-back signal and then, and using external software, noise can be injected into the signal until bit error rate starts to climb. This technique enables the designer to obtain a clear picture of the limits of the design, and the robustness of the recovery system.
A New Generation of Tools for Storage Device Testing
Increasing capacity requirements for storage devices lead to the development of new and faster read-and-write strategies for magnetic as well as optical storage devices. Multi-level coding of data for storage on optical disks is also being considered as an efficient way to increase storage capacity.
The Tektronix AWG Series is unsurpassed in its ability to generate an accurate reproduction of disk Read and Write signals. This enables users to design and develop advanced storage devices with high confidence that the full range of functionalities can be accurately validated and characterized. With sample rates up to 20 GS/s and the ability to generate up to 6 signals (2 analog outputs plus 4 digital markers) with clock timing resolution of 100 ps, these AWGs represent a new benchmark in the industry.
Most modern full-featured AWGs offer several means of procuring waveforms to be loaded into the instrument’s memory. Waveform libraries are provided with many models. These include application-specific pulses and streams that can be concatenated with the instrument’s sequence editor.
Because many AWGs are connected to PCs via LAN or GPIB (and with USB memory devices gaining favor as well), compatibility with waveform formats generated by software tools such as MATLAB and Excel is becoming the norm. This enables designers to develop their waveform files without relying on the AWG itself. Completed waveform files can be loaded directly into the AWG’s memory.
Sometimes it is helpful to use the AWG to supply a signal that is exactly identical to a specific real-world event or bit stream. This is the concept of the “golden reference”—typically a signal that precisely mimics one from either a known good circuit or one with well understood failing characteristics. But replicating all the edges, transients, and harmonics of such a signal is almost impossible using the normal math and editing methods.
Fortunately, today’s full-featured AWGs have a solution. These instruments can download a waveform directly from a compatible oscilloscope. The process is simple: use the oscilloscope’s sophisticated triggering capability to detect and acquire the event(s) of interest, then simply transfer a sample-perfect copy of the signal from the oscilloscope’s waveform memory to that of the AWG via LAN, GPIB or a USB memory stick. Using its internal sequencer, the AWG will repeat the signal as often as you wish, at any frequency within its range. Amplitude can be scaled as well.
Dealing With Measurement System Jitter
An oscilloscope can evaluate jitter and produce accurate measurements of amplifier vertical noise, sample clock jitter, quantization error, trigger jitter, and interpolation error. Figure 8 shows the measurement of a single falling edge made with a DPO. The standard deviation, sigma σ, of the jitter as shown by the histogram is 3.14 ns.
The oscilloscope measurement also shows that 100% of the points fall within ±5 sigma of the mean. This statistic is further supported by the peak-to-peak jitter measurement of 26.5 ns.
Statistical confidence in measurements increases with the number of sample points collected. Tektronix DPO oscilloscopes with their integrated 3D database can collect statistical information of tens of millions of samples per second. In this example, over 100,000 acquisitions were made, providing over 1 million data points for the calculation.
Measuring Jitter
Timing jitter in index or preamble lock detection circuits makes it difficult to view waveforms from successive revolutions. The typical result is a blurred waveform because identical waveforms from successive revolutions are captured at slightly different times. The histogram function of the DPO can be used, as in Figure 8, to statistically determine the amount of jitter on the Read signal. A DPO accurately displays dynamic complex waveforms with three dimensions of waveform data in real time.

TAA Measurement
Track Average Amplitude is the average peak-to-peak value of the data on the Read channel signal over a specified range of sectors. Typically, the acquisition of a complete sector is required to provide enough peak-totrough pairs for an accurate statistical measurement to be made. TAA is defined as:

where:
– i is an index for each measurement
– N is the number of positive and negative pulse pairs
– Vp-p is the peak-to-peak voltage
Using the basic test setup described described on the previous page and the DDM measurement software, trigger setup is performed automatically so that the oscilloscope triggers on the index pulse. The user simply chooses the range of sectors to test. The software tool performs the measurement by acquiring the user defined sector(s) and performing the TAA measurement for the data area of that sector(s).
The measurements can then be Read out directly or stored in a reference memory to produce a graphic representation of the TAA measurement over a range of sectors. To speed up the measurement process, the user may specify a smaller region of each track segment by using the time cursors.
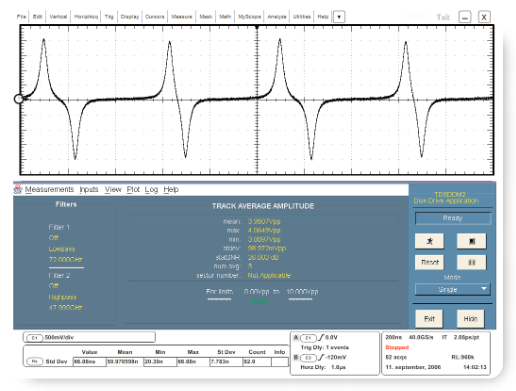
Figure 9 shows the results of a TAA measurement using a DPO with a differential probe. The software has displayed the quantitative results in a separate pane on the screen.
PW50 Measurement
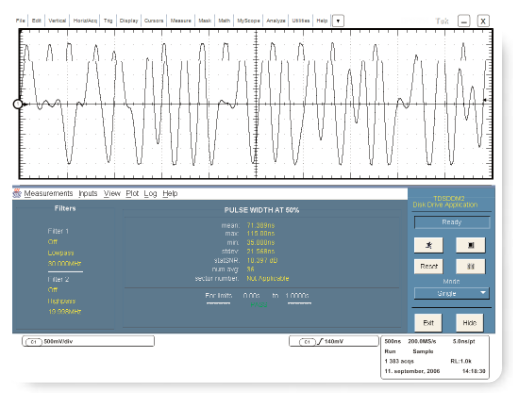
The PW50 measurement provides the average pulse width at 50% of the peak value for both positive and negative peaks. These pulses are derived from transitions written at a spacing that minimizes pulse interaction and also creates enough pulses around the recording track to provide an adequate statistical sample from which to calculate the average. To complete this measurement, the user specifies the preamble offset time from the sector pulse to ensure that the measurement algorithm excludes all nonuniform segments such as write splices, servo gaps, header fields, etc.
As with the TAA measurement, the application software performs the measurement by acquiring the data area of each sector and performing the PW50 measurements. In order to speed up the measurement process, the user may specify a smaller region of each track segment by using the cursors or by decreasing the record length. Half of the TAA value is used as the threshold level at which to measure the pulse width of each positive and negative pulse. The average pulse width for all pulses around the track are measured.
The PW50+ measurement uses only the positive peaks to determine an average pulse width, and PW50– uses only negative. The Snapshot PW50 measurement includes the following: PW50, PW50+, PW50–, resolution, number of averages, number of measurements in the average, time peak-to-trough, time trough-to-peak, time asymmetry, period resolution, and frequency. In addition, it reads out limit test results, hysteresis settings, and filter settings (Figure 10).
Computing SNR
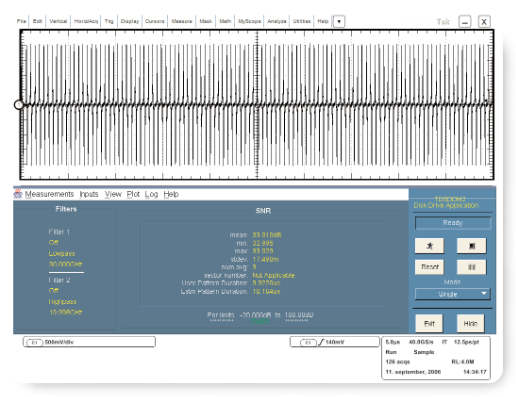
The signal-to-noise ratio measurement, SNR, determines the ratio of the variance of the Read-back signal to Read-back noise. The measured noise may consist of media noise, crosstalk, electronic noise, and other noise characteristics of disk drive operation.
Because SNR is defined in terms of variances of the signal and noise, it is independent of DC offsets of the Read-back voltage. The SNR measurement algorithm assumes that the acquired signal consists of a periodic signal and independent additive noise. The noise is assumed to be responsible for all the non-periodic behavior of the acquired waveform. Noise samples are assumed to be independent and identically distributed. The SNR measurement is defined as follows:

where:
– σ2s is the variance of the noise-free periodic signal
– σ2n is the variance of the noise
In order to perform the measurement, a signal must be acquired containing at least three estimated periods of the waveform. The oscilloscope will examine the waveform using an estimated period length, supplied by the user, and then calculate a more exact period (Figure 11). The user can specify a tolerance of up to 30% for the estimated period of the noisy periodic signal. The wide range of tolerance for the period estimation is very important because slight variations in disk rotation speed make it difficult for the user to provide an exact value for period length.
NLTS Measurement
The nonlinear transition shift (NLTS) measurement included in the application software package enables the user to measure three types of NLTS on the media:
– Initial magnetization (DC erased)
– First adjacent transition
– Second adjacent transition
The initial magnetization of the media can affect the position at which transitions (reverses in magnetization) are recorded. Initial magnetization is characterized by a delay in a transition, occurring when the new transition reverses the direction of the previous magnetization (Figure 12).
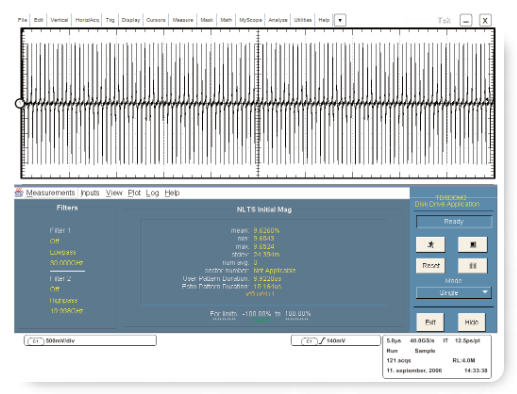
The second transition in a series of consecutive transitions is called the adjacent transition, or first adjacent transition. The first adjacent transition is characterized as follows: When Write data requires transitions on consecutive data bits, the latter transition is shifted earlier in time. In other words, when one transition in a series occurs, then the following transition occurs earlier than it should (Figure 13).
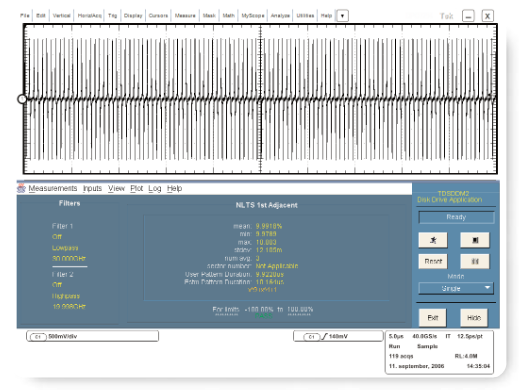
Subsequent transitions in the series of consecutive transitions are grouped into the category called second adjacent transition. Second adjacent transitions are similar to first adjacent transitions. The difference is that the transitions are separated by two bit periods instead of one (Figure 14).

In order to perform the measurement, a signal containing at least three estimated periods of the waveform must be acquired. The oscilloscope examines the waveform using an estimated period length supplied by the user, and then calculates a more exact period. The user can specify a tolerance of up to 30% for the estimated period of the noisy periodic signal. The wide range of tolerance for the period estimation is very important because slight variations in disk rotation speed make it difficult for the user to provide an exact value for period length, thereby causing inconsistencies in the measurement results.
When NLTS can be characterized and understood, its effects can be mitigated with Write pre-compensation.
Capturing Read-channel Errors
Since the data stored on a hard drive is not always contiguous, capturing infrequent Read-channel aberrations can be difficult. The solution is to selectively capture data using the advanced triggering functions of a DPO.
Traditional oscilloscope trigger circuits provide singlelevel thresholds. In other words, the instrument triggers if the input signal rises above or falls below the trigger voltage level. This is known as Edge triggering. Some oscilloscopes, including high-end DPOs, offer a number of advanced triggering functions: Pattern/State, Setup & Hold, Pulse Width, Glitch, Runt Pulse, Slew Rate, Serial Bit Pattern, and Timeout. These simplify the task of isolating specific disk drive anomalies.
Runt pulse triggering is particularly useful for capturing Read channel errors. With Runt pulse triggering, the oscilloscope triggers if a signal reaches a first voltage threshold but does not reach a second higher threshold. For example, runt triggering can be used to find only those pulses that fall between 50% and 75% of track-average-amplitude.
Time-qualified triggering functions such as Pulse Width, Glitch, Setup & Hold, and Timeout capture events that meet or do not meet selectable timing criteria. For example, the some DPOs can be set to capture only those pulses that fall between two pulse width thresholds. Time-qualified triggering can find missing, extra, and mistimed pulses in the data recovery channel.
Read-channel Signal Spectrum
Spectral measurements in drive Read channels have typically required a spectrum or network analyzer. Today’s digitizing oscilloscopes (including DPOs) provide built-in spectral analysis tools that increase your options. Sampling rates are now fast enough and record lengths long enough to provide sufficient frequency domain resolution.
Integrated digital signal processing (DSP) techniques such as the Fast Fourier Transform (FFT) provide the basis for making spectral computations from timedomain waveforms. Skeptics of high-speed FFT analysis wonder whether or not the 8-bit A/D converters found in high-bandwidth digitizing oscilloscopes provide sufficient dynamic range for frequency domain analysis. Theoretically, 8-bits provide only 48 dB of dynamic range. But when the FFT computes a magnitude, it multiplies a complex exponential by the data record and averages all the resulting samples. This results in magnitude values with resolution greater than 8 bits. In addition to the averaging inherent to the FFT function, the output magnitudes may also be averaged. This often results in additional dynamic range, since it effectively lowers the noise floor by 10 to 20 dB.
Servo Positioning
It’s the servo positioning unit’s job to keep the head centered over the track. In order to do that, disk drive manufacturers embed timing and positioning signals in each sector that provide the information the actuator needs to fine-tune the position of the Read/Write heads. The servo system uses the embedded positioning signals to create a position error signal that the actuator uses to dynamically reposition the heads.
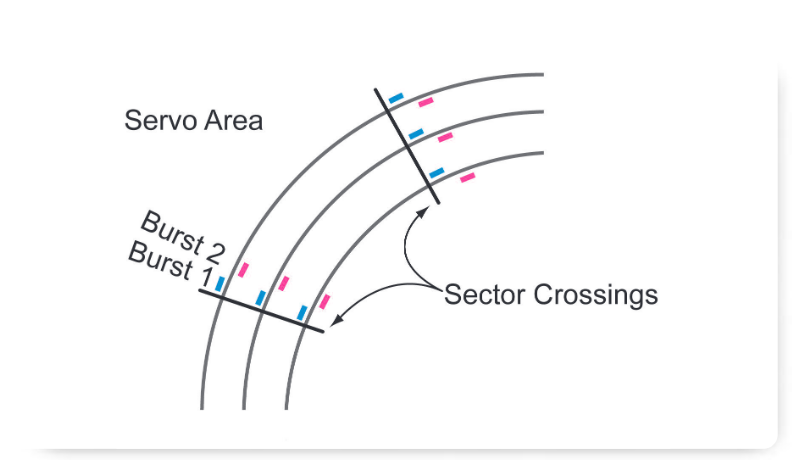
Typically, embedded servo signals are placed on each side of the track at the beginning of each sector as shown in Figure 15. In this block diagram, BURST 1 is placed slightly on the outside of the track; BURST 2 is placed slightly inside the track. When the Read head crosses this area, the burst amplitudes are Read. If the amplitudes of these two signals are the same, the Read/Write head is positioned correctly along the track’s centerline. When the amplitude of one is larger than the other, the Read/Write head is positioned incorrectly and must be repositioned by applying a corrective voltage to the actuator. This corrective voltage is often referred to as the “Position Error Signal.”
Conclusion
Tektronix’ comprehensive combination of highperformance probes, oscilloscopes, arbitrary waveform generators and software gives you the ability to capture and analyze disk drive problems from the media to the Read/Write heads, and on to the Read channel electronics, spindle motors, servo positioning circuitry, digital interfaces, and embedded processors.
Tektronix digitizing oscilloscopes deliver the sample rate, bandwidth, and precision to handle the most demanding HDD measurement applications.
More than any other available instrument, the Tektronix arbitrary waveform generator (AWG), is capable of delivering accurate simulations of real-world signals, with or without aberrations. Similarly, it can produce mathematically ideal signals for compliance testing. As a disk drive design nears completion, the AWG can even provide entire sectors’ worth of simulated disk data. Virtually every signal parameter, including noise and jitter, is programmable.

