
You work hard to ensure your electronic test and measurement equipment is calibrated and available to support production. You spend hours diligently answering an auditor’s questions. But, instead of the metaphorical gold star you were hoping for, the auditor comes back with unfortunate news. You’ve failed the audit. What’s your next move?
Understanding the ramifications of an audit failure is the crucial first step.
Who gets audited and why?
Like them or not, audits are a crucial part of the certification and accreditation processes and help ensure that organizations are meeting or exceeding the requirements of strict standards like ISO 9001, ISO/IEC 17025, and IATF 16949. In certain applications like the semiconductor, telecom, and aerospace industries, manufacturers are mandated by law to adhere to the appropriate industry standard, and for good reason. Products that have an impact on the health and safety of consumers or military personnel need to be dependable and function exactly as expected.
Accurate and repeatable measurement during the manufacturing process ensures product quality, and the best way to ensure accurate and repeatable measurement is through regular calibration of the electronic test and measurement equipment used in production.
Organizations are often also subjected to internal audits, industry standards compliance audits, as well as audits from customers. For manufacturers that have several locations and a centralized quality management team, internal audits ensure that appropriate processes are being followed and that the organization can pass an audit from a third party when that time comes. Similarly, when companies in regulated industries look for new suppliers or service providers, an audit is often a part of the process to qualify new vendors.
The Cost of Audit Failure
For semiconductor, automotive, aerospace, telecom and other safety-critical applications, the cost of failing an audit can be much larger than initially realized. Here are just a few of the more common scenarios:
- Failing an audit results in significant hours devoted to investigating the extent of the problem and implementing corrective actions
- Failing an audit results in the non-approval of your company as a vendor on a prime contract, causing reputation damage that can lead to long-term financial consequences in the form of missed business opportunities.
- The failure results in a product recall, resulting in damage to a company’s credibility while costing significant revenue and expense.
Addressing a Failed Audit
What went wrong?
The next step in addressing a failed audit is to understand exactly why you were found out of conformance. There are several common reasons why organizations can fail an audit. Those include:
- Lack of Adequate Procedures – Are the people completing calibration tasks properly trained? If you have an in-house calibration lab, are you calibrating in controlled environments? Are you using the right calibration intervals? In-house and third-party labs alike are responsible for ensuring their procedures are adequate based on manufacturer recommendations and quality system requirements.
- Lack of Documentation of Procedures – Failing to document your procedures makes it more likely that those procedures won’t be followed. Auditors want to see that you have the right processes and procedures in place as required by various quality standards. Even if you are doing all the right things, you’ll fail the audit if you haven’t properly documented your procedures.
- Poor Calibration Records Storage – Auditors will spot check records to make certain your equipment is in compliance, so it’s vital that you can quickly find and retrieve calibration records. Calibration certificates, service records and out of tolerance (OOT) investigation results are examples of documents auditors are likely to request.
Pay close attention to the auditor’s report to see where you need to improve. Chances are good that the next audit will begin with deficiencies that were found in the past, so make sure to understand the auditor’s concerns so you can address them thoroughly.
Get a Second Opinion
Calling in a respected and knowledgeable third-party calibration provider like Tektronix can be a big help in identifying and correcting deficiencies in your calibration program. These third-party labs have expert technicians and program managers with decades of experience helping clients pass the calibration portion of their audit. Have a third-party perform an independent audit to verify and document the gaps in your program.
Understand What Goes Into a Quality Calibration
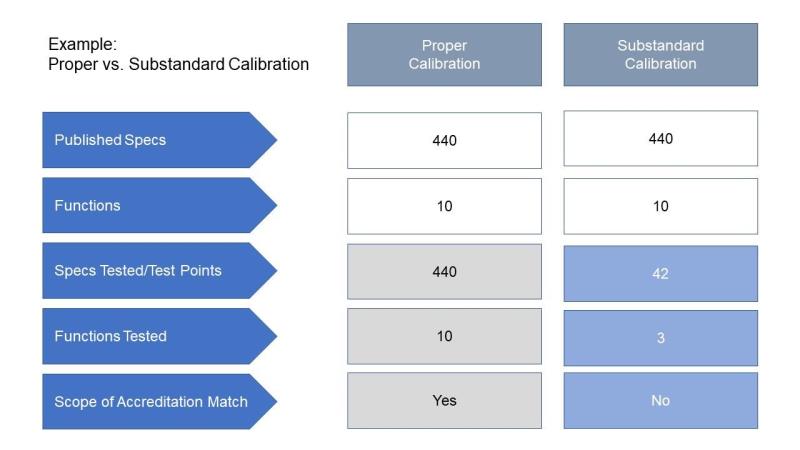
Whether you are calibrating your equipment in-house or using a third-party calibration provider, it’s important to understand what should be included in a ‘proper’ calibration. While it’s tempting to cut corners to save time or attempt to cut cost with a budget calibration provider, it’s important to remember the cost of investigation, rework, and recalls that can result from poor quality calibration and audit findings. Equipment calibration isn’t just about getting a sticker. Here are a few key components of a quality calibration:
- Measurement to Published Specifications – When manufacturers introduce a piece of test and measurement equipment to the market, they also publish the recommended calibration procedure along with a list of functions and test points. For more advanced pieces of equipment, there can be hundreds of published test points. Make sure you or your calibration provider are testing ALL the functions and test points to guarantee a proper calibration.
- Capture the Data – Complete data is the evidence of the work performed. For accredited calibrations, the “As Found” and “As Left” data for each measurement should be included with the calibration certificate.
- Calibration Certificate – The calibration certificate is an official document of record to show traceability to national standards. The certificate should always include the logo of the lab’s accrediting body, the standard used to calibrate the equipment, the calibration date, the measurement uncertainties, and the full data mentioned above. It’s also vital that you ensure that a third-party calibration provider is operating within its approved scope of accreditation. Based on the capabilities of the calibration standards in a lab, the accrediting body lays out a scope of accreditation that essentially qualifies a lab to perform calibration for specific types of equipment.

Building an Audit-Proof Calibration Program
Now that you’ve received the findings from your audit, verified the gaps in your calibration program with an expert third party like Tektronix, and have a better understanding of what goes into a proper calibration, it’s time to re-evaluate your calibration strategy and create a plan for improvements.
This is the time to ask tough questions. Do I have the right expertise in house to do a good job managing my calibration program? Or, am I using the right third-party calibration provider? If you are failing audits, the answer is likely “no” to either of those questions.
Addressing audit findings of inadequate procedures and documentation. Quality third-party calibration providers can provide consulting services to help your internal calibration teams right the ship, take on calibrations of the more sophisticated equipment to free up your team’s time, or actually manage your entire calibration program for you. Calibration service experts including Tektronix are certified and accredited to national and international standards and already have well-documented policies and procedures in place to ensure clients pass audits. So, instead of rebuilding your calibration program from the ground up, you may consider trusting your equipment calibration with a competent third-party provider.
Addressing poor calibration records storage findings. Many third-party calibration providers also give customers access to online tools to help track calibration status as well as store service records and calibration certificates. Instant, anywhere access to an online database of records makes complying with an auditor’s requests simple and straightforward at the time of audit.
Remember, calibration is more than just getting a sticker. The cost of non-compliance is much higher in the long run than investing in quality calibrations, documentation, and procedures now. If you do decide that finding a new third-party calibration vendor is the right thing to do, make sure you ask about their past audit performance and set up a small test run of equipment to be calibrated so that you can do your own small-scale audit to ensure calibration quality before you trust them with ongoing service.


