This application note describes considerations and techniques for making accurate current measurements on power converters using an oscilloscope and a current probe.
When used in conjunction with an oscilloscope’s voltage measurements capabilities, current probes can enable a wide variety of important power measurements, such as instantaneous power, average power, and phase.

Why Are Accurate Measurements Critically Important?
Today’s power supply designers and test engineers are generally working to find very small incremental improvements in performance of their device-under-test. The overall goal is usually to find ways to increase power conversion efficiency, or said another way, reduce losses in the design. Most power conversion loss gets converted to heat, increasing not only the overall power consumption but also affecting other design goals such as battery life, size of heat sinks, and possibly the need for cooling fans - adding cost and potentially reducing reliability. A more efficient design with reduced losses has many benefits.
Sources of loss may be found in nearly every sub-section of a power converter, with key areas of interest often being the switching semiconductors, magnetics, and rectifiers. Performance improvements in the low-digit percent values and fractions of a percent can be meaningful. But to accurately evaluate and measure such small performance increases, the most accurate measurements are critical.
Choosing an Approach for Power Measurements
We have discussed careful selection and use of voltage probes for power measurements in another application note ("Making Accurate Voltage Measurements on Power Converters with Oscilloscopes 51W-60161.") For many key measurements on power converters, accurate measurement of current is also necessary. To ensure accurate current measurements, the most appropriate current measuring technique must be selected and applied correctly
At a high level, there are two techniques that can be used to measure the current flowing through a device: measuring the voltage drop across an in-line resistance, and using a current probe. Each has advantages and disadvantages.
Measuring Current as a Voltage Drop Across a Shunt Resistor
Some power supply designs may have current sense (“shunt”) resistors built into the design for feedback. One current measurement technique is to measure the differential voltage drop across such a resistor. These are generally low-value resistors, often smaller than 1 Ohm.
If a current sense resistor is designed into the power supply, this is the most convenient approach. Measuring the voltage drop across the sense resistor with an active differential probe will provide good results, as long as the common-mode signal is within the probe’s specified operating range and the voltage drop is large enough. However, using a differential probe on low-level signals requires some attention to noise reduction in the measurement system. Use the lowest available probe attenuation and limit bandwidth on the probe or the oscilloscope to reduce measurement system noise. Also, keep in mind that the probe’s capacitance and resistance will be in parallel with the sense resistor, and although they are designed to minimize the impact on the device under test, you should be aware that they exist.

Introducing a sense resistor in series with the load requires careful design consideration. As the resistance value increases, the voltage drop per ampere increases according to Ohm’s Law, thus improving the quality of the current measurement. However, the power dissipation in the resistor increases with the square of the current and the additional voltage drop must be accounted for. In addition, resistors add inductive reactance to the circuit. And, don’t forget that the differential probe input capacitance appears in parallel with the sense resistor, forming an RC filter.
If you do add a sense resistor to the circuit, try to add it as close to ground as possible to minimize the common mode signals across the resistor that the measurement system must reject. And, unlike high-performance current probes, the common-mode rejection performance of differential voltage measurements tends to fall off over frequency, reducing the accuracy of high-frequency current measurements with sense resistors.
If you are using voltage probes to measure current through a known resistance, the measurement becomes essentially a voltage measurement and the guidelines for making accurate voltage measurements apply. The remainder of this application note will cover the use of clamp-on current probes.

Measuring Current with a Current Probe
Current flow through a conductor causes an electromagnetic flux field to form around the conductor. Current probes are designed to sense the strength of this field and convert it to a corresponding voltage for measurement by an oscilloscope. This allows you to view and analyze current waveforms with an oscilloscope. When used in combination with an oscilloscope’s voltage measurement capabilities, current probes also allow you to make a wide variety of power measurements. Depending on the waveform math capabilities of the oscilloscope, these measurements can include instantaneous power, true power, apparent power, and phase.
There are two primary types of current probes for oscilloscopes: AC current probes and AC/DC current probes. Both types use the principle of transformer action for sensing alternating current (AC) in a conductor.
For transformer action, there must be alternating current flow through a conductor. This alternating current causes a flux field to build and collapse according to the amplitude and direction of current flow. When a sensing coil is placed in this magnetic field, as shown in Figure 3, the changing flux field induces a proportional voltage across the coil through simple transformer action. This current-related voltage signal is then conditioned and can be displayed as a current-scaled waveform on an oscilloscope.

The simplest AC current probes are passive devices which are simply a coil that has been wound to precise specifications on a magnetic core such as a ferrite material. Some are solid toroids and require the user to route the conductor through the core. Split-core current probes use a precisely-designed mechanical system that allows the core to be opened and clamped around the conductor without breaking the circuit under test. Split-core current probes are capable of high sensitivity and operate without power, but are mechanically rigid and typically have a small aperture, which can limit their versatility.
AC current probes based on Rogowski coil technology, such as shown in Figure 4, are an alternative to solid- and splitcore current probes. The Rogowski coil uses an air core and is mechanically flexible, allowing the coil to be opened and wrapped around a wire or component lead. And, because the core is not a magnetic material, Rogowski coils do not magnetically saturate at high current levels, even thousands of Amps. However, they tend to have lower sensitivity than split-core probes, and they require active signal conditioners to integrate the signal from the coil, and thus require a power source.

For many power conversion applications, a split-core, AC/DC current probe (see Figure 5) is the most versatile, accurate and easy-to-use solution. AC/DC current probes use a transformer to measure AC currents and a Hall-Effect device to measure DC current. Since they include active electronics to support the Hall-Effect sensor, AC/DC probes require a power source to operate. This power source can be a separate power supply, or may be integrated into some oscilloscopes.
Using Current Probes
Connecting Current Probes
Because a current probe head must encircle a conductor, it is wise to consider adding current probe access to a product’s design-for-test requirements for critical measurements. This access can include individual current-carrying cables or a circuit board cutout around a current-carrying trace. If such access is included in the design, the probe can easily be connected around it, and if the cable or trace is an integral part of the design, it is less likely to cause the kind of problems that can be introduced by fitting temporary loops.
If no such conductor is available, it is necessary to add a wire loop or tip up a component and add a wire in series to accommodate the probe head. When adding a wire loop to a printed circuit assembly, there are several considerations:
Be careful when orienting the loop and probe over the circuit because the resulting loop area will be significantly larger than the connection in the original circuit, making the circuit more susceptible to magnetic coupling of noise.
Consider the inductive insertion impedance that is added to the circuit. A typical current probe may add a few nanoHenries of inductance, but the total inserted inductive reactance (see Figure 6 on page 7) is probably dominated by the inductance of the wire (about 20 nH / inch) added to accommodate the current probe.
Because current probes respond to the total current flowing through them, measurement sensitivity can be improved by wrapping multiple turns of the conductor around the current probe, as shown in Figure 7 (on page 7). If the conductor goes through the current sensor N times, the sensitivity is increased by a factor of N. The actual current value is then determined by dividing the total measured amplitude by N.
Note: Winding more turns around the probe increases the insertion impedance (inductance rises as the square of the turns). This reduces the upper bandwidth limit of the probe.

The choice of where to connect the current probe can have a significant effect on measurement results. Here are a few considerations for selecting a connection point:
Consider the parasitic capacitances between the conductor and the current probe body and between the current probe body and ground. Fast slew-rate voltage signals can be capacitively coupled into the probe body. Whenever possible, probe on low-impedance nodes to minimize the loading effects of capacitive coupling to ground. Also, probing on the grounded side of the circuit will minimize the signal’s slew rate (dV/dt) driving the parasitic capacitance.
To reduce the susceptibility of the probe to radiated noise, try connecting a probe ground lead from the ground connection on the current probe to the circuit ground. This may increase the parasitic capacitance from the probe head to ground, but it should make the probe’s internal shielding more effective.


Probe Settings
Current probes often have controls for settings on the probes themselves. On older probes, these may be adjusted through switches or thumbwheels on the probe or amplifier. Newer probes work in concert with the scope to control these settings.
Range. Current probes often support two current ranges.For example, a TCP0030A AC/DC Current Probe has a 5 Amp range and a 30 Amp range. The higher range allows for the capture of higher peak currents, but it also generates a smaller signal to the oscilloscope, resulting in a lower signal to noise ratio. So, the best measurement results are achieved when the probe scale is set as sensitive as possible without clipping the peaks on the current waveform.
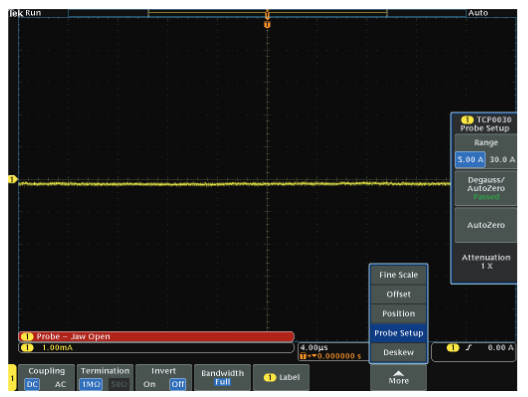
Degauss/Zero. Prior to taking measurements, remember to degauss the current probe (to remove residual magnetic flux) and remove DC offset (manually or automatically). Figure 8 shows a prompt from an oscilloscope reminding you to run the degauss procedure. Temporarily disconnect the probe from the circuit or de-energize the circuit while degaussing and removing DC offset from the probe.
Oscilloscope Setup for Current Measurement
After making connections, and choosing your probe settings, your oscilloscope must be set up to take your measurements. There are a number of considerations for setting up your oscilloscope for optimal current measurements.
Accurate measurements always begin with a calibrated oscilloscope. Allow the oscilloscope to warm up for at least 20 minutes to reach a stable internal temperature. The majority of short-term errors are caused by amplifier drift over time and temperature. It is highly recommended that the oscilloscope be calibrated before making critical measurements, when the ambient temperature has changed more than 5 degrees Celsius, and at least once a month. With many oscilloscopes, this calibration is automated and takes just a few minutes to complete. (For example, on the Tektronix Windows-based oscilloscopes, this calibration feature is called Signal Path Compensation (SPC) and is found in the Utilities->Instrument Calibration… menu. Just follow the on-screen directions.)
Get the most out of your oscilloscope’s dynamic range. Adjust the coarse and fine vertical scale controls so that the signals fill most of the display vertically, but that the peaks do not extend beyond the top or bottom of the display. Using most of the display, and thus most of the dynamic range of the oscilloscope, will give the best measurement resolution and higher signal-to-noise ratio.
Whenever you are taking power measurements, or comparing timing between voltage and current probes, it is critical that you deskew the probes. Each probe has a different propagation delay, and the differences can be dramatic, especially when comparing voltage and current probes. Figure 9 shows an example of this. Because the instantaneous power calculation is the sample-by-sample product of the voltage and current waveforms, precise time (phase) matching of the waveforms is required.


The deskew process time-aligns the signals at the oscilloscope inputs, assuring the calculated power waveform represents the circuit’s true instantaneous power. Tektronix offers deskew fixtures that can be used for this process, for example part number 067-1686-xx optimized for use with MDO3000, MDO4000, and MSO/DPO5000 Series oscilloscopes. Figure 9 illustrates the results of using the oscilloscope’s automated deskew feature.
Use bandwidth limits or filters on the oscilloscope to help reduce noise. Using more bandwidth than you really need to measure your signal passes high-frequency noise to the scope’s digitizer without adding value. Using bandwidth limits in the oscilloscope or the probe reduces the amount of noise that makes it to the digitizer. Many instruments include a 20 MHz bandwidth limit, and sometimes other values as well, usually under the vertical channel menu.
Noise can also be reduced and measurement resolution improved by using signal processing in your oscilloscope. The next section describes averaging and HiRes acquisition modes, which are useful for improving measurement resolution for repetitive and non-repetitive signals, respectively.

Averaging Acquisition Mode
The first is waveform averaging, shown in Figure 10, which averages corresponding samples from subsequent triggered acquisitions. This technique does require a repetitive signal, but provides very effective removal of random noise. And, if the sample rate is very high compared to the frequencies of interest, the effective system bandwidth is not affected.
Waveform averaging increases the vertical resolution of the sampled waveform:
Enhanced Resolution = 0.5 log2 (N)
where N represents the total number of waveform averages.

HiRes Acquisition Mode
HiRes mode, shown in Figure 11, is a form of boxcar averaging. This technique averages a group of successive samples within an acquisition. As such, this technique will work with single-shot events, and is effective at removing random noise.
As with waveform averaging, HiRes increases the vertical resolution of the waveforms:
Enhanced Resolution = 0.5 log2 (D)
where D is the decimation ratio, or the maximum sample rate / actual sample rate.
A side benefit of HiRes is that the effective system bandwidth is predictably reduced, helping to limit the noise bandwidth of the system. The resulting -3 dB bandwidth (unless further limited by the measurement system’s analog bandwidth) is:
BW = 0.44 * SR
where BW is the bandwidth (in Hertz) and SR is the actual sample rate in (samples/second.)
Current Probes: Selection Criteria and Specifications
The online Oscilloscope Probe & Accessory Selector Tool at www.tektronix.com/probes is a great way to find a current probe for your application. When choosing a current probe, there are multiple performance criteria, as well as fit-to-application criteria that should be considered.
Ask yourself these questions:
1. Do I need to measure AC current, DC current, or both?
Most current probes designed for use with oscilloscopes fall into one of two categories: AC-only or AC/DC. AC-only probes are inherently simpler, and are basically a fieldcoupled transformer (see below for more discussion of AC current probe theory.) In some cases, they may also be a more economical option because of their relative simplicity compared to AC/DC probes. But if your signal under test includes DC current components (intended or unintended) that need to be characterized, then an AC/DC probe is a better option to assure that all signal characteristics get measured.
2. What is my minimum and maximum current level to be measured, and with what sensitivity?
Maximum current handling capability is a key performance specification. Tektronix current probes are available with ratings ranging from microamperes to thousands of amperes.
Maximum current is often specified with two values: a maximum continuous current and a maximum pulse current. The maximum pulse current can be significantly higher than the maximum continuous current, but only if the pulse is narrower than a given value. The pulse maximum and duration are given in the datasheet or manual for the probe.
It might be tempting to choose a probe with a high maximum current, but you will trade off sensitivity. A probe with high current capability will typically lose resolution & accuracy if used to measure a signal with very low amplitude at the bottom of its useful range.
Sensitivity must be viewed both in terms of the current probe and the oscilloscope. For example, a probe might output 1 mV for every 10 mA. In order to see 10 mA differences, the scope must have sufficient amplification to display a 1 mV change. Typically a sensitivity specification is given on the probe datasheet and should include any requirements on the part of the oscilloscope.
3. What bandwidth and rise time are my signals?
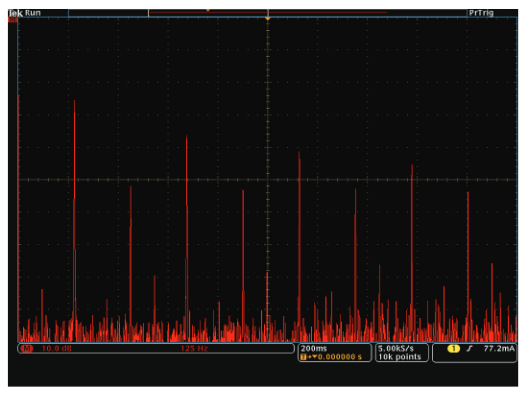
Like voltage probes, bandwidth is a key specification for current probes. When measuring non-sinusoidal current waveforms that are common in today’s switch-mode power converters, it’s important to take into account the harmonic content in your signals to be measured. Switching waveforms include much of their energy at frequencies higher than the fundamental switching frequency, as shown in Figure 12.
Accurately measuring these harmonics will require probe bandwidth many times higher than the fundamental frequency. For example, the 5th harmonic of a 100 kHz switching signal will be 500 kHz. Rise time is closely related to bandwidth and it is often specified for current probes. Rise time may be an easier specification to evaluate if you are concerned about measurements on switching power supplies.
4. Will the probe fit in my system?
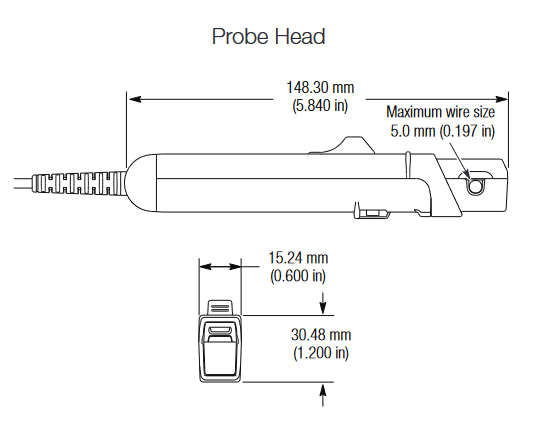
Probe designers work to minimize the size of current probes within the constraints of performance and safety requirements. For most applications, the jaw diameter is designed to hold a typical conductor capable of carrying the rated current of the probe. However, if your conductors have very heavy insulation, check to make sure they will fit easily in the jaw of the probe.
5. What oscilloscope will the probe be used with?
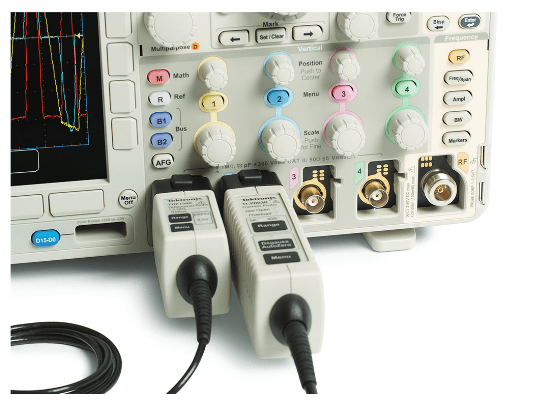
Tektronix oscilloscopes employ several different styles of probe connection interfaces; some are optimized for signal fidelity at extremely high bandwidths. Some are designed to support communication between probe and oscilloscope. Current probes available from Tektronix also use a variety of interface styles and connectors. For making power measurements on many power conversion devices, an oscilloscope that uses the TekVPI® probe interface may be an excellent choice. This interface provides several valuable functions, including the DC power supply required by active probes (including many current probes) plus intelligent communication that can automate probe settings and alerts such as scaling, units, degauss, overload, probe open, etc.
Integrating Probes, Oscilloscope, and Automation Software
Be sure that the current and voltage probe scale factors and units are reflected in the oscilloscope measurement system. This will simplify the interpretation of the measurement results and prevent errors. Wherever possible, use probes that automatically communicate their attenuation factors and units to the oscilloscope.
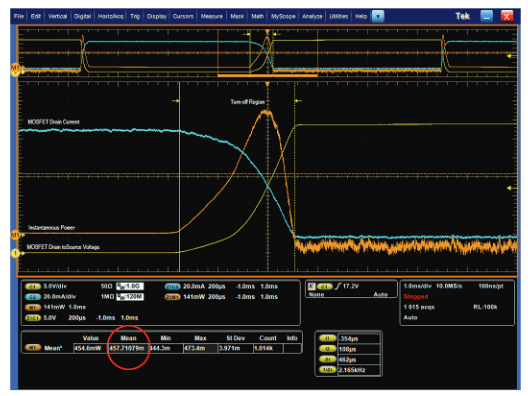
Figure 16 shows an example measurement of switching loss, where yellow channel one is a voltage measurement (in Volts) from a TDP1000 differential probe, cyan channel two is a current measurement (in Amps) from a TCP0030 AC/DC current probe, orange M1 math channel is calculating the instantaneous power (in Watts.) The scale factors and units were all automatically set up by the probes and oscilloscope, with no user interaction.
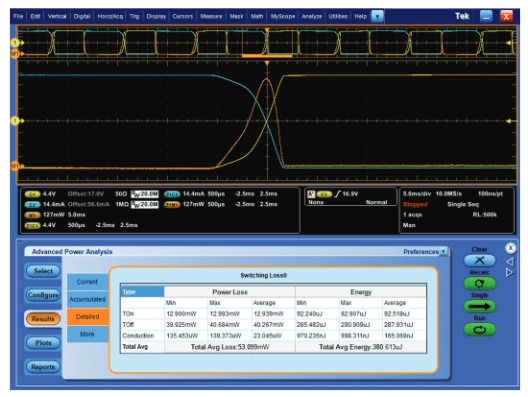
Ideally, you should use a power measurement application to simplify oscilloscope setup and improve measurement repeatability. Applications such as Tektronix DPOPWR, shown in the lower half of Figure 17, can automate the acquisition, signal processing, and analysis of power waveforms, and provide standardized documentation of the measurement results.
Conclusion
Using the measurement techniques described in this application note, accurate power measurements can be made using high-performance current probes (plus voltage probes) and a compatible oscilloscope, when proper setup techniques are applied. Automated by a power measurement application, these measurements can be made even more easily and repeatably.


