Kontaktaufnahme
Live-Chat mit Tektronix-Vertretern. Verfügbar von 9 bis 17 Uhr CET Geschäftstage.
Kontaktieren Sie uns telefonisch unter
Verfügbar von 9 bis 17 Uhr CET Geschäftstage.
Download
Laden Sie Handbücher, Datenblätter, Software und vieles mehr herunter:
Feedback
AWG5200 Series
This manual provides the theory of operation, service instructions, and lists of replaceable parts for the AWG52XX instruments.
Dieses Handbuch bezieht sich auf:
AWG5202, AWG5204, AWG5208
By downloading, you agree to the terms and conditions of the Manuals Download Agreement.Manuals Download Agreement
ATTENTION: please read the following terms and conditions carefully before downloading any documents from this website. By downloading manuals from Tektronix' website, you agree to the following terms and conditions:
Manuals for Products That Are Currently Supported:
Tektronix hereby grants permission and license to owners of Tektronix instruments to download and reproduce the manuals on this website for their own internal or personal use. Manuals for currently supported products may not be reproduced for distribution to others unless specifically authorized in writing by Tektronix, Inc.
A Tektronix manual may have been revised to reflect changes made to the product during its manufacturing life. Thus, different versions of a manual may exist for any given product. Care should be taken to ensure that one obtains the proper manual version for a specific product serial number.
Manuals for Products That Are No Longer Supported:
Tektronix cannot provide manuals for measurement products that are no longer eligible for long term support. Tektronix hereby grants permission and license for others to reproduce and distribute copies of any Tektronix measurement product manual, including user manuals, operator's manuals, service manuals, and the like, that (a) have a Tektronix Part Number and (b) are for a measurement product that is no longer supported by Tektronix.
A Tektronix manual may be revised to reflect changes made to the product during its manufacturing life. Thus, different versions of a manual may exist for any given product. Care should be taken to ensure that one obtains the proper manual version for a specific product serial number.
This permission and license does not apply to any manual or other publication that is still available from Tektronix, or to any manual or other publication for a video production product or a color printer product.
Disclaimer:
Tektronix does not warrant the accuracy or completeness of the information, text, graphics, schematics, parts lists, or other material contained within any measurement product manual or other publication that is not supplied by Tektronix or that is produced or distributed in accordance with the permission and license set forth above.
Tektronix may make changes to the content of this website or to its products at any time without notice.
Limitation of Liability:
TEKTRONIX SHALL NOT BE LIABLE FOR ANY DAMAGES WHATSOEVER (INCLUDING, WITHOUT LIMITATION, ANY CONSEQUENTIAL OR INCIDENTAL DAMAGES, DAMAGES FOR LOSS OF PROFITS, BUSINESS INTERRUPTION, OR FOR INFRINGEMENT OF INTELLECTUAL PROPERTY) ARISING OUT OF THE USE OF ANY MEASUREMENT PRODUCT MANUAL OR OTHER PUBLICATION PRODUCED OR DISTRIBUTED IN ACCORDANCE WITH THE PERMISSION AND LICENSE SET FORTH ABOVE.
Read Online
MAINTENANCE
- Introduction
- Inspection and cleaning
- Remove and replace
- Remove and replace procedures not requiring factory calibration
- Software upgrades
- Calibration
- Diagnostics
- Back up data
- Diagnostics overview
- Using the Log directory
- Files and utilities
- Diagnostics & Calibration window
- Torunservicediagnostics.dita
- Repackaging instructions
Preface
This manual contains information needed to service some parts of the AWG5200 Arbitrary Waveform Generators. If further service is required, send the instrument to a Tektronix Service Center.
If the instrument does not function properly, troubleshooting and corrective measures should be taken immediately to prevent additional problems from occurring.
- The procedures in this manual should be performed only by a qualified service person.
- Read the General safety summary and the Service safety summary.
When using this manual for servicing, be sure to follow all warnings, cautions, and notes.
Manual conventions
This manual uses certain conventions with which you should become familiar.
- Names of front-panel controls and menus appear in the same case (initial capitals, all capitals, etc.) in the manual as is used on the instrument front panel and menus.
- Instruction steps are numbered unless there is only one step.
- Bold text refers to specific interface elements that you are instructed to select, click, or clear.
- Example: Press the ENTER button to access the PRESET submenu.
-
Italic text refers to document names or sections. Italics are also used in NOTES, CAUTIONS, and WARNINGS.
- Example: The Replaceable parts section includes an exploded view diagram.
Safety
Symbols and terms related to safety appear in the General safety summary.
Product documentation
The following table lists additional documents for the AWG5200 Series Arbitrary Waveform Generators.
| Document | Tektronix PN | Description | Availability |
|---|---|---|---|
| Safety and Installation Instructions | 071-3529-XX |
This document provides product safety, compliance, environmental, and power on information and basic instrument power specifications. | http://www.tek.com/downloads |
| Printable Help | 077-1334-XX | This PDF file is a printable version of the AWG5200 Series instrument help content. It provides information on controls and screen elements. | http://www.tek.com/downloads |
|
Specifications and Performance Verification Technical Reference | 077-1335-XX |
This document provides complete AWG5200 Series instrument specifications and explains how to verify that the instrument is performing according to the specifications. | http://www.tek.com/downloads |
|
AWG5200 Series Rackmount Instructions (GF–RACK3U) | 071-3534-XX |
This document provides instructions to mount the AWG5200 Series Arbitrary Waveform Generators into a standard 19-inch equipment rack. | http://www.tek.com/downloads |
| AWG5200 Series Declassification and Security Instructions | 077-1338-xx | This document provides instructions for clearing and sanitizing the instrument for declassification and securuty purposes. | http://www.tek.com/downloads |
Important safety information
This manual contains information and warnings that must be followed by the user for safe operation and to keep the product in a safe condition.
To safely perform service on this product, see the Service safety summary that follows the General safety summary.
General safety summary
Use the product only as specified. Review the following safety precautions to avoid injury and prevent damage to this product or any products connected to it. Carefully read all instructions. Retain these instructions for future reference.
This product shall be used in accordance with local and national codes.
For correct and safe operation of the product, it is essential that you follow generally accepted safety procedures in addition to the safety precautions specified in this manual.
The product is designed to be used by trained personnel only.
Only qualified personnel who are aware of the hazards involved should remove the cover for repair, maintenance, or adjustment.
Before use, always check the product with a known source to be sure it is operating correctly.
This product is not intended for detection of hazardous voltages.
Use personal protective equipment to prevent shock and arc blast injury where hazardous live conductors are exposed.
While using this product, you may need to access other parts of a larger system. Read the safety sections of the other component manuals for warnings and cautions related to operating the system.
When incorporating this equipment into a system, the safety of that system is the responsibility of the assembler of the system.
To avoid fire or personal injury
Use proper power cord.
Use only the power cord specified for this product and certified for the country of use.
Ground the product.
This product is grounded through the grounding conductor of the power cord. To avoid electric shock, the grounding conductor must be connected to earth ground. Before making connections to the input or output terminals of the product, ensure that the product is properly grounded. Do not disable the power cord grounding connection.
Power disconnect.
The power cord disconnects the product from the power source. See instructions for the location. Do not position the equipment so that it is difficult to operate the power cord; it must remain accessible to the user at all times to allow for quick disconnection if needed.
Observe all terminal ratings.
To avoid fire or shock hazard, observe all rating and markings on the product. Consult the product manual for further ratings information before making connections to the product.
Do not apply a potential to any terminal, including the common terminal, that exceeds the maximum rating of that terminal.
Do not operate without covers
Do not operate this product with covers or panels removed, or with the case open. Hazardous voltage exposure is possible.
Avoid exposed circuitry
Do not touch exposed connections and components when power is present.
Do not operate with suspected failures.
If you suspect that there is damage to this product, have it inspected by qualified service personnel.
Disable the product if it is damaged. Do not use the product if it is damaged or operates incorrectly. If in doubt about safety of the product, turn it off and disconnect the power cord. Clearly mark the product to prevent its further operation.
Examine the exterior of the product before you use it. Look for cracks or missing pieces.
Use only specified replacement parts.
Do not operate in wet/damp conditions
Be aware that condensation may occur if a unit is moved from a cold to a warm environment.
Do not operate in an explosive atmosphere
Keep product surfaces clean and dry
Remove the input signals before you clean the product.
Provide proper ventilation.
Refer to the installation instructions in the manual for details on installing the product so it has proper ventilation.
Slots and openings are provided for ventilation and should never be covered or otherwise obstructed. Do not push objects into any of the openings.
Provide a safe working environment
Always place the product in a location convenient for viewing the display and indicators.
Avoid improper or prolonged use of keyboards, pointers, and button pads. Improper or prolonged keyboard or pointer use may result in serious injury.
Be sure your work area meets applicable ergonomic standards. Consult with an ergonomics professional to avoid stress injuries.
Use care when lifting and carrying the product. This product is provided with a handle or handles for lifting and carrying.
 | WARNING:The product is heavy. To reduce the risk of personal injury or damage to the device get help when lifting or carrying the product. |
 | WARNING:The product is heavy. Use a two-person lift or a mechanical aid. |
Use only the Tektronix rackmount hardware specified for this product.
Terms in this manual
These terms may appear in this manual:
 | WARNING:Warning statements identify conditions or practices that could result in injury or loss of life. |
 | CAUTION:Caution statements identify conditions or practices that could result in damage to this product or other property. |
Terms on the product
These terms may appear on the product:
- DANGER indicates an injury hazard immediately accessible as you read the marking.
- WARNING indicates an injury hazard not immediately accessible as you read the marking.
- CAUTION indicates a hazard to property including the product.
Symbols on the product
|
| When this symbol is marked on the product, be sure to consult the manual to find out the nature of the potential hazards and any actions which have to be taken to avoid them. (This symbol may also be used to refer the user to ratings in the manual.) |
The following symbols(s) may appear on the product.
 |  |  |  |
Service safety summary
The Service safety summary section contains additional information required to safely perform service on the product. Only qualified personnel should perform service procedures. Read this Service safety summary and the General safety summary before performing any service procedures.
To avoid electric shock
Do not touch exposed connections.
Do not service alone
Do not perform internal service or adjustments of this product unless another person capable of rendering first aid and resuscitation is present.
Disconnect power
To avoid electric shock, switch off the product power and disconnect the power cord from the mains power before removing any covers or panels, or opening the case for servicing.
Use care when servicing with power on
Dangerous voltages or currents may exist in this product. Disconnect power, remove battery (if applicable), and disconnect test leads before removing protective panels, soldering, or replacing components.
Verify safety after repair
Always recheck ground continuity and mains dielectric strength after performing a repair.
Theory of operation
This section describes the electrical operation of the AWG5200 Series Arbitrary Waveform Generators.
System overview
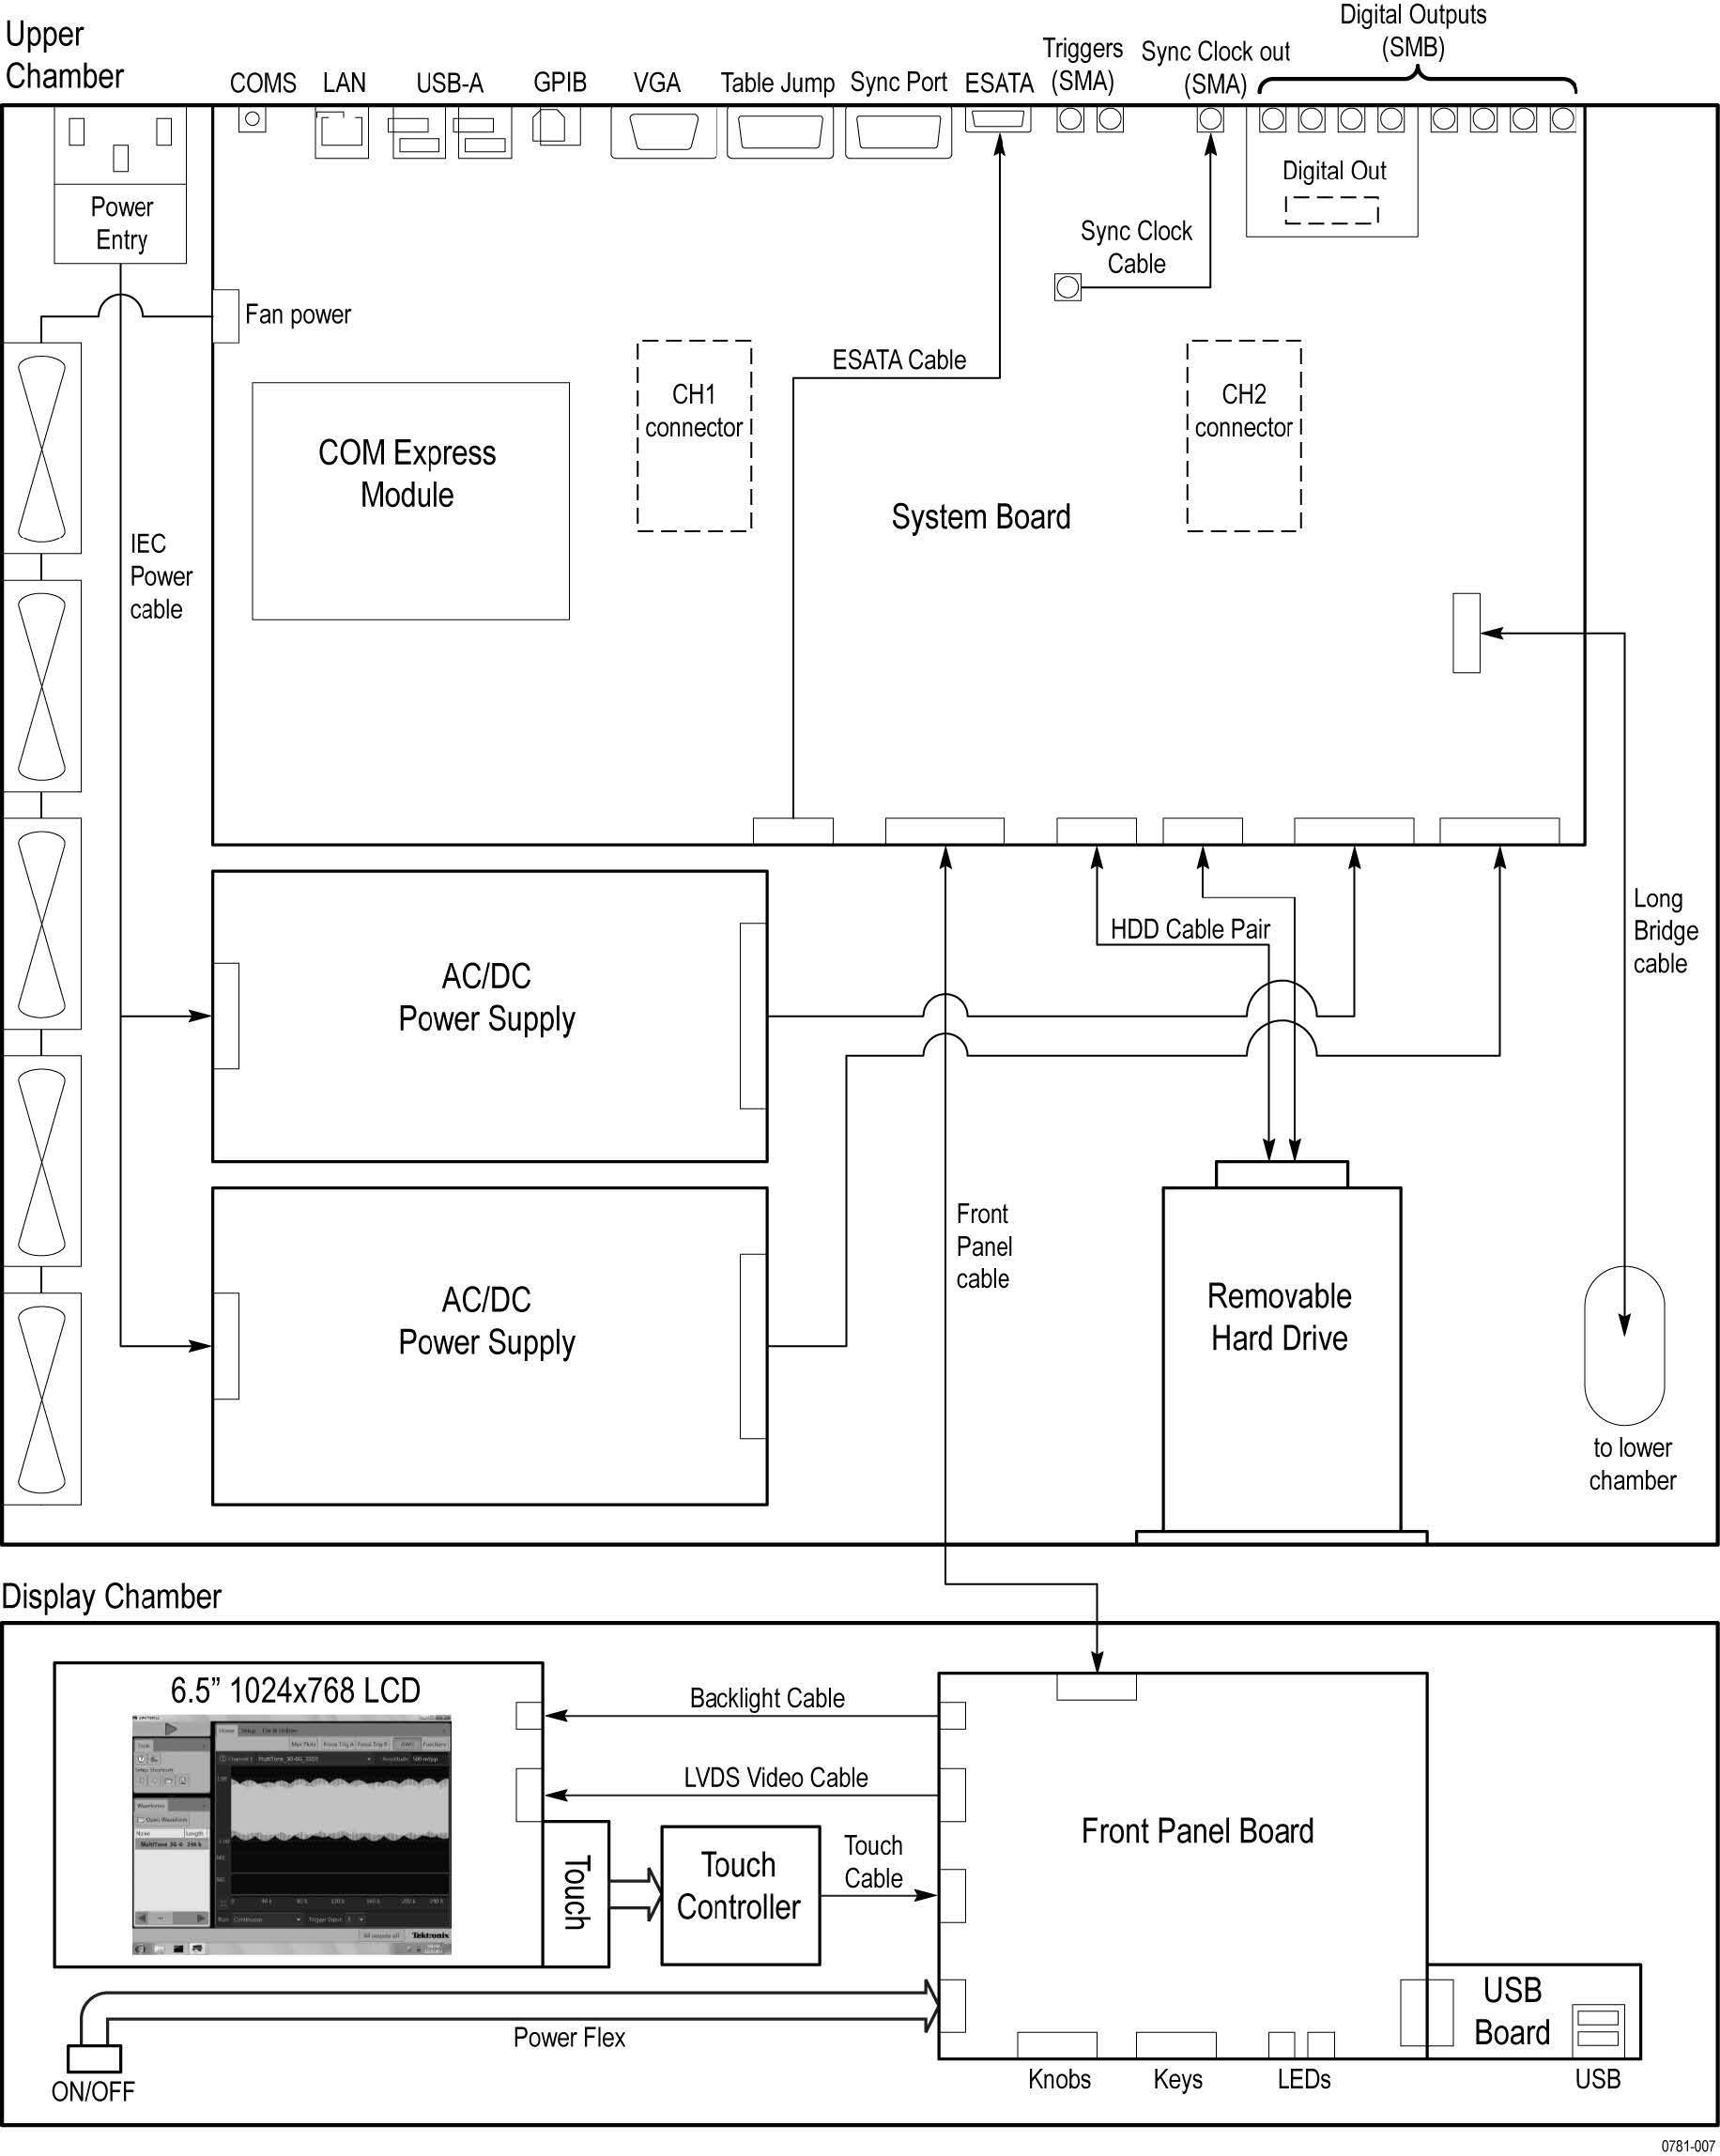
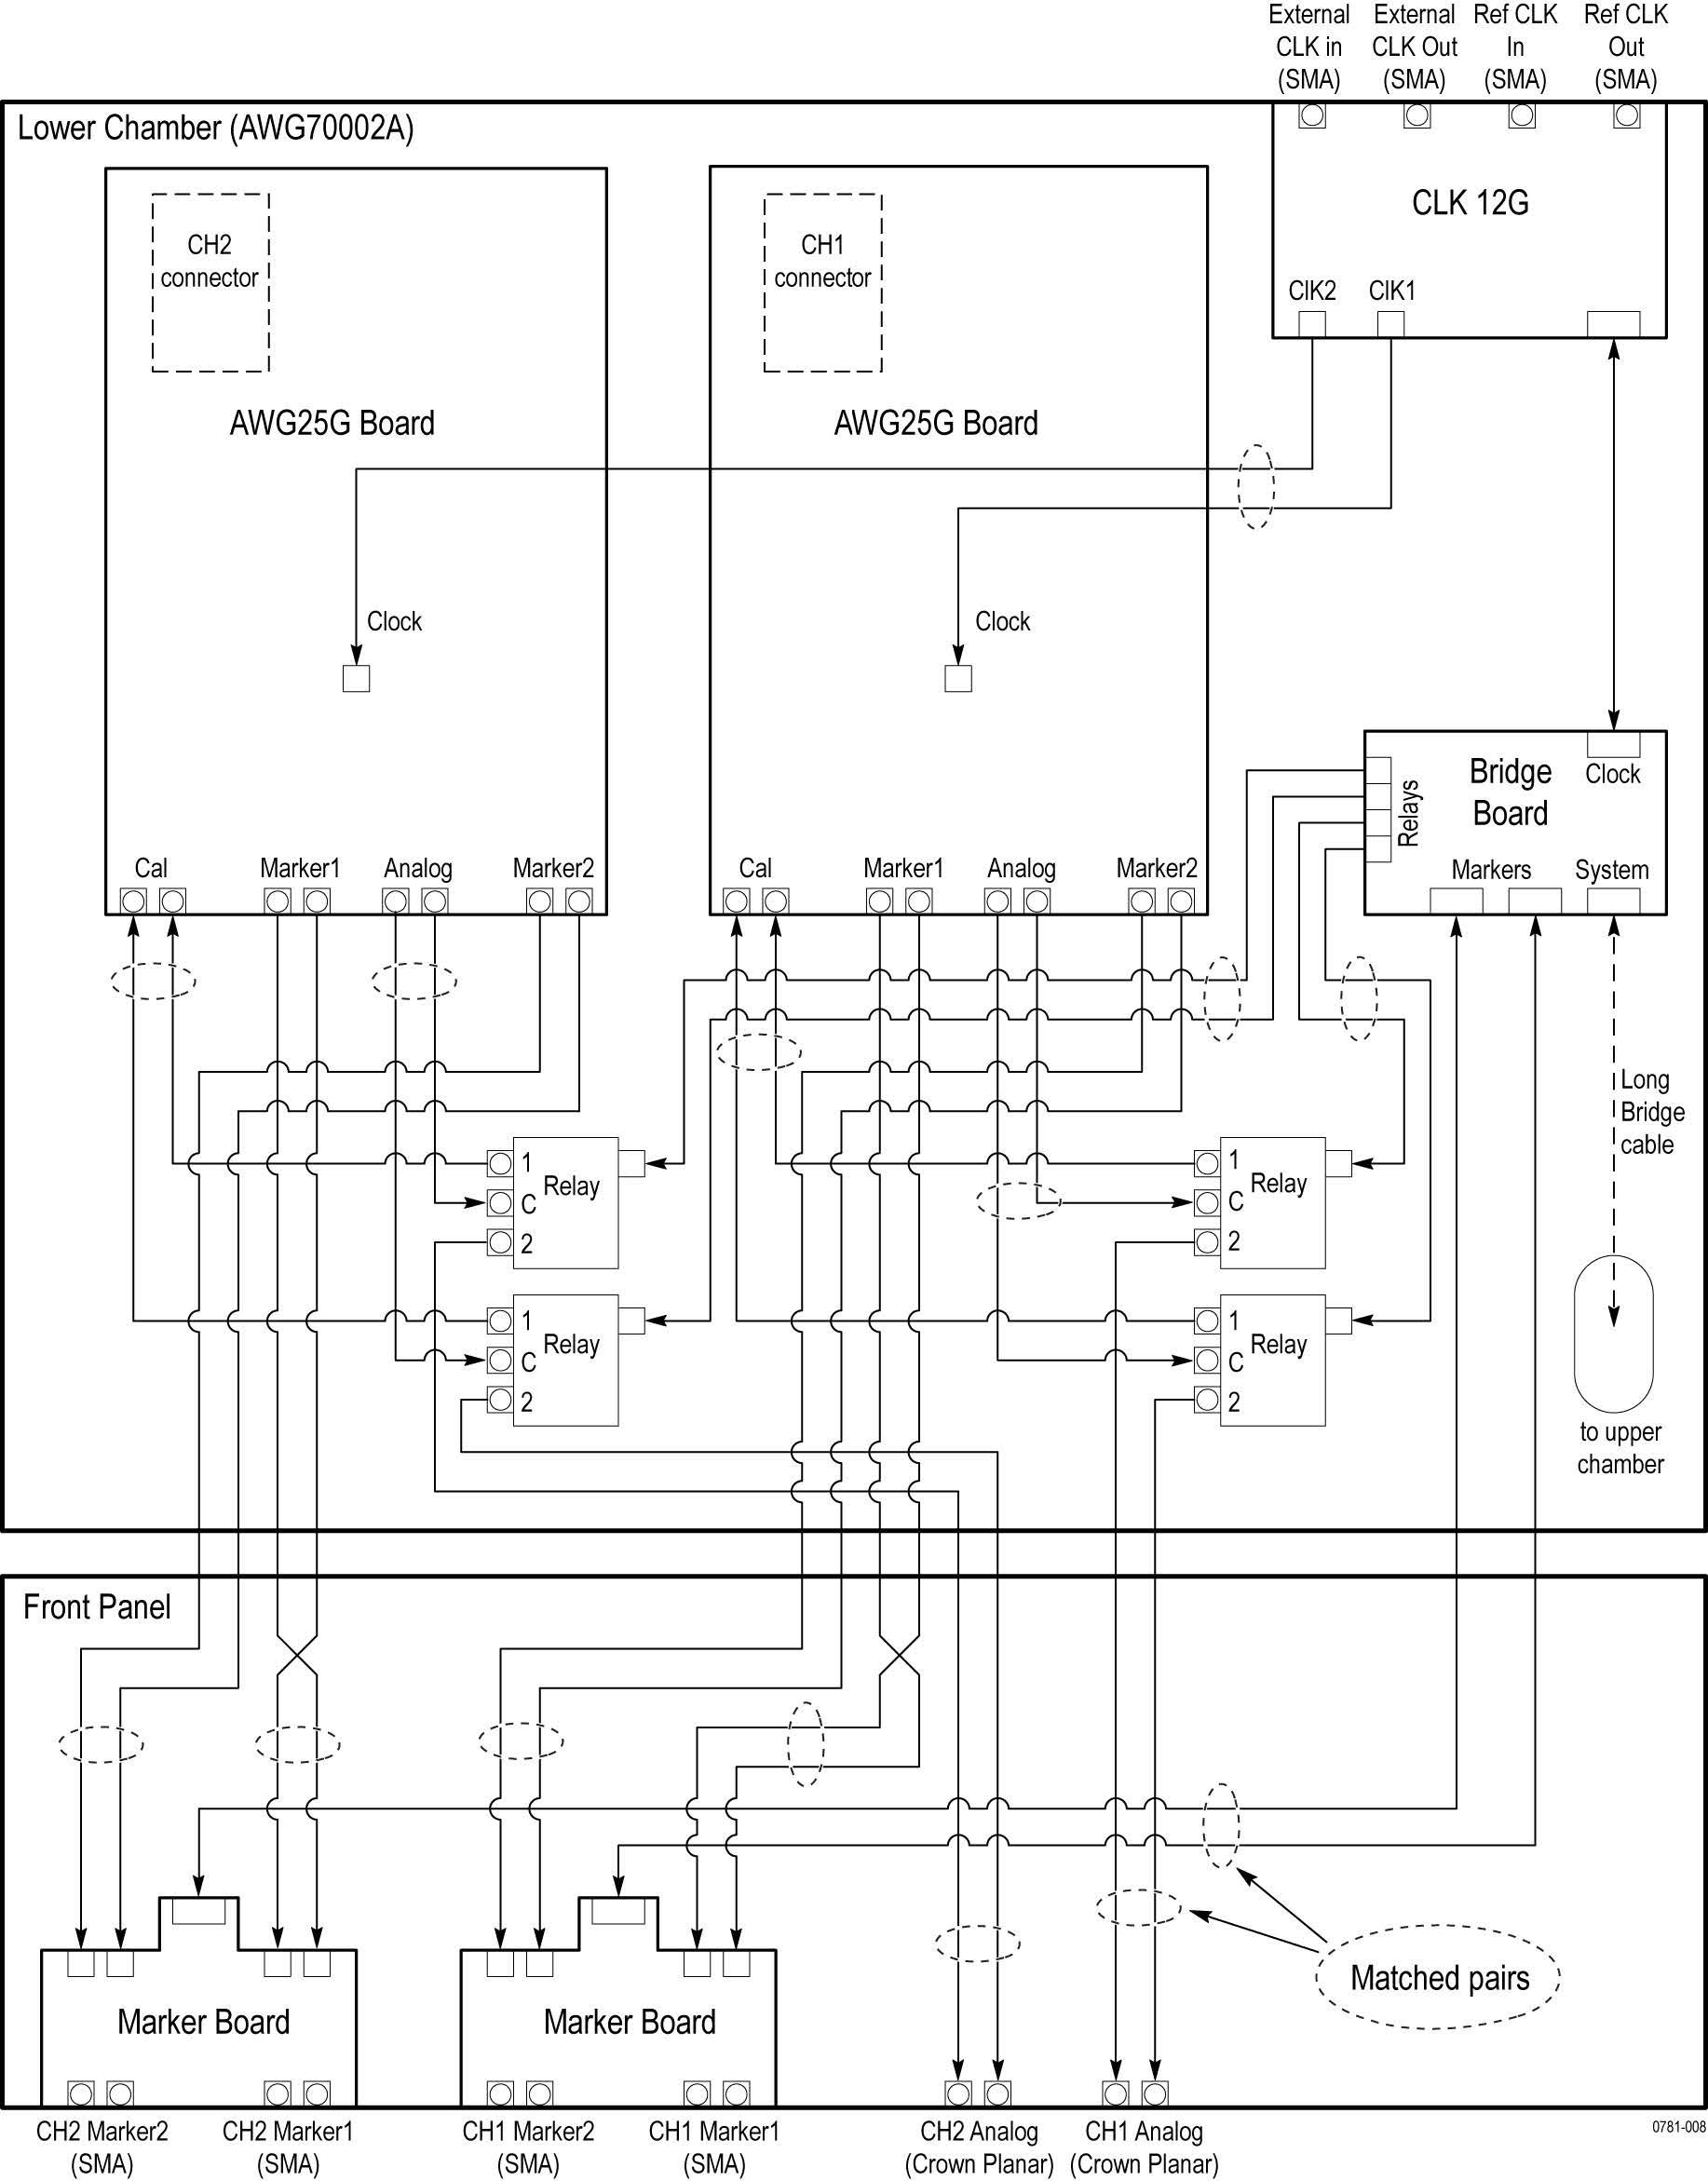
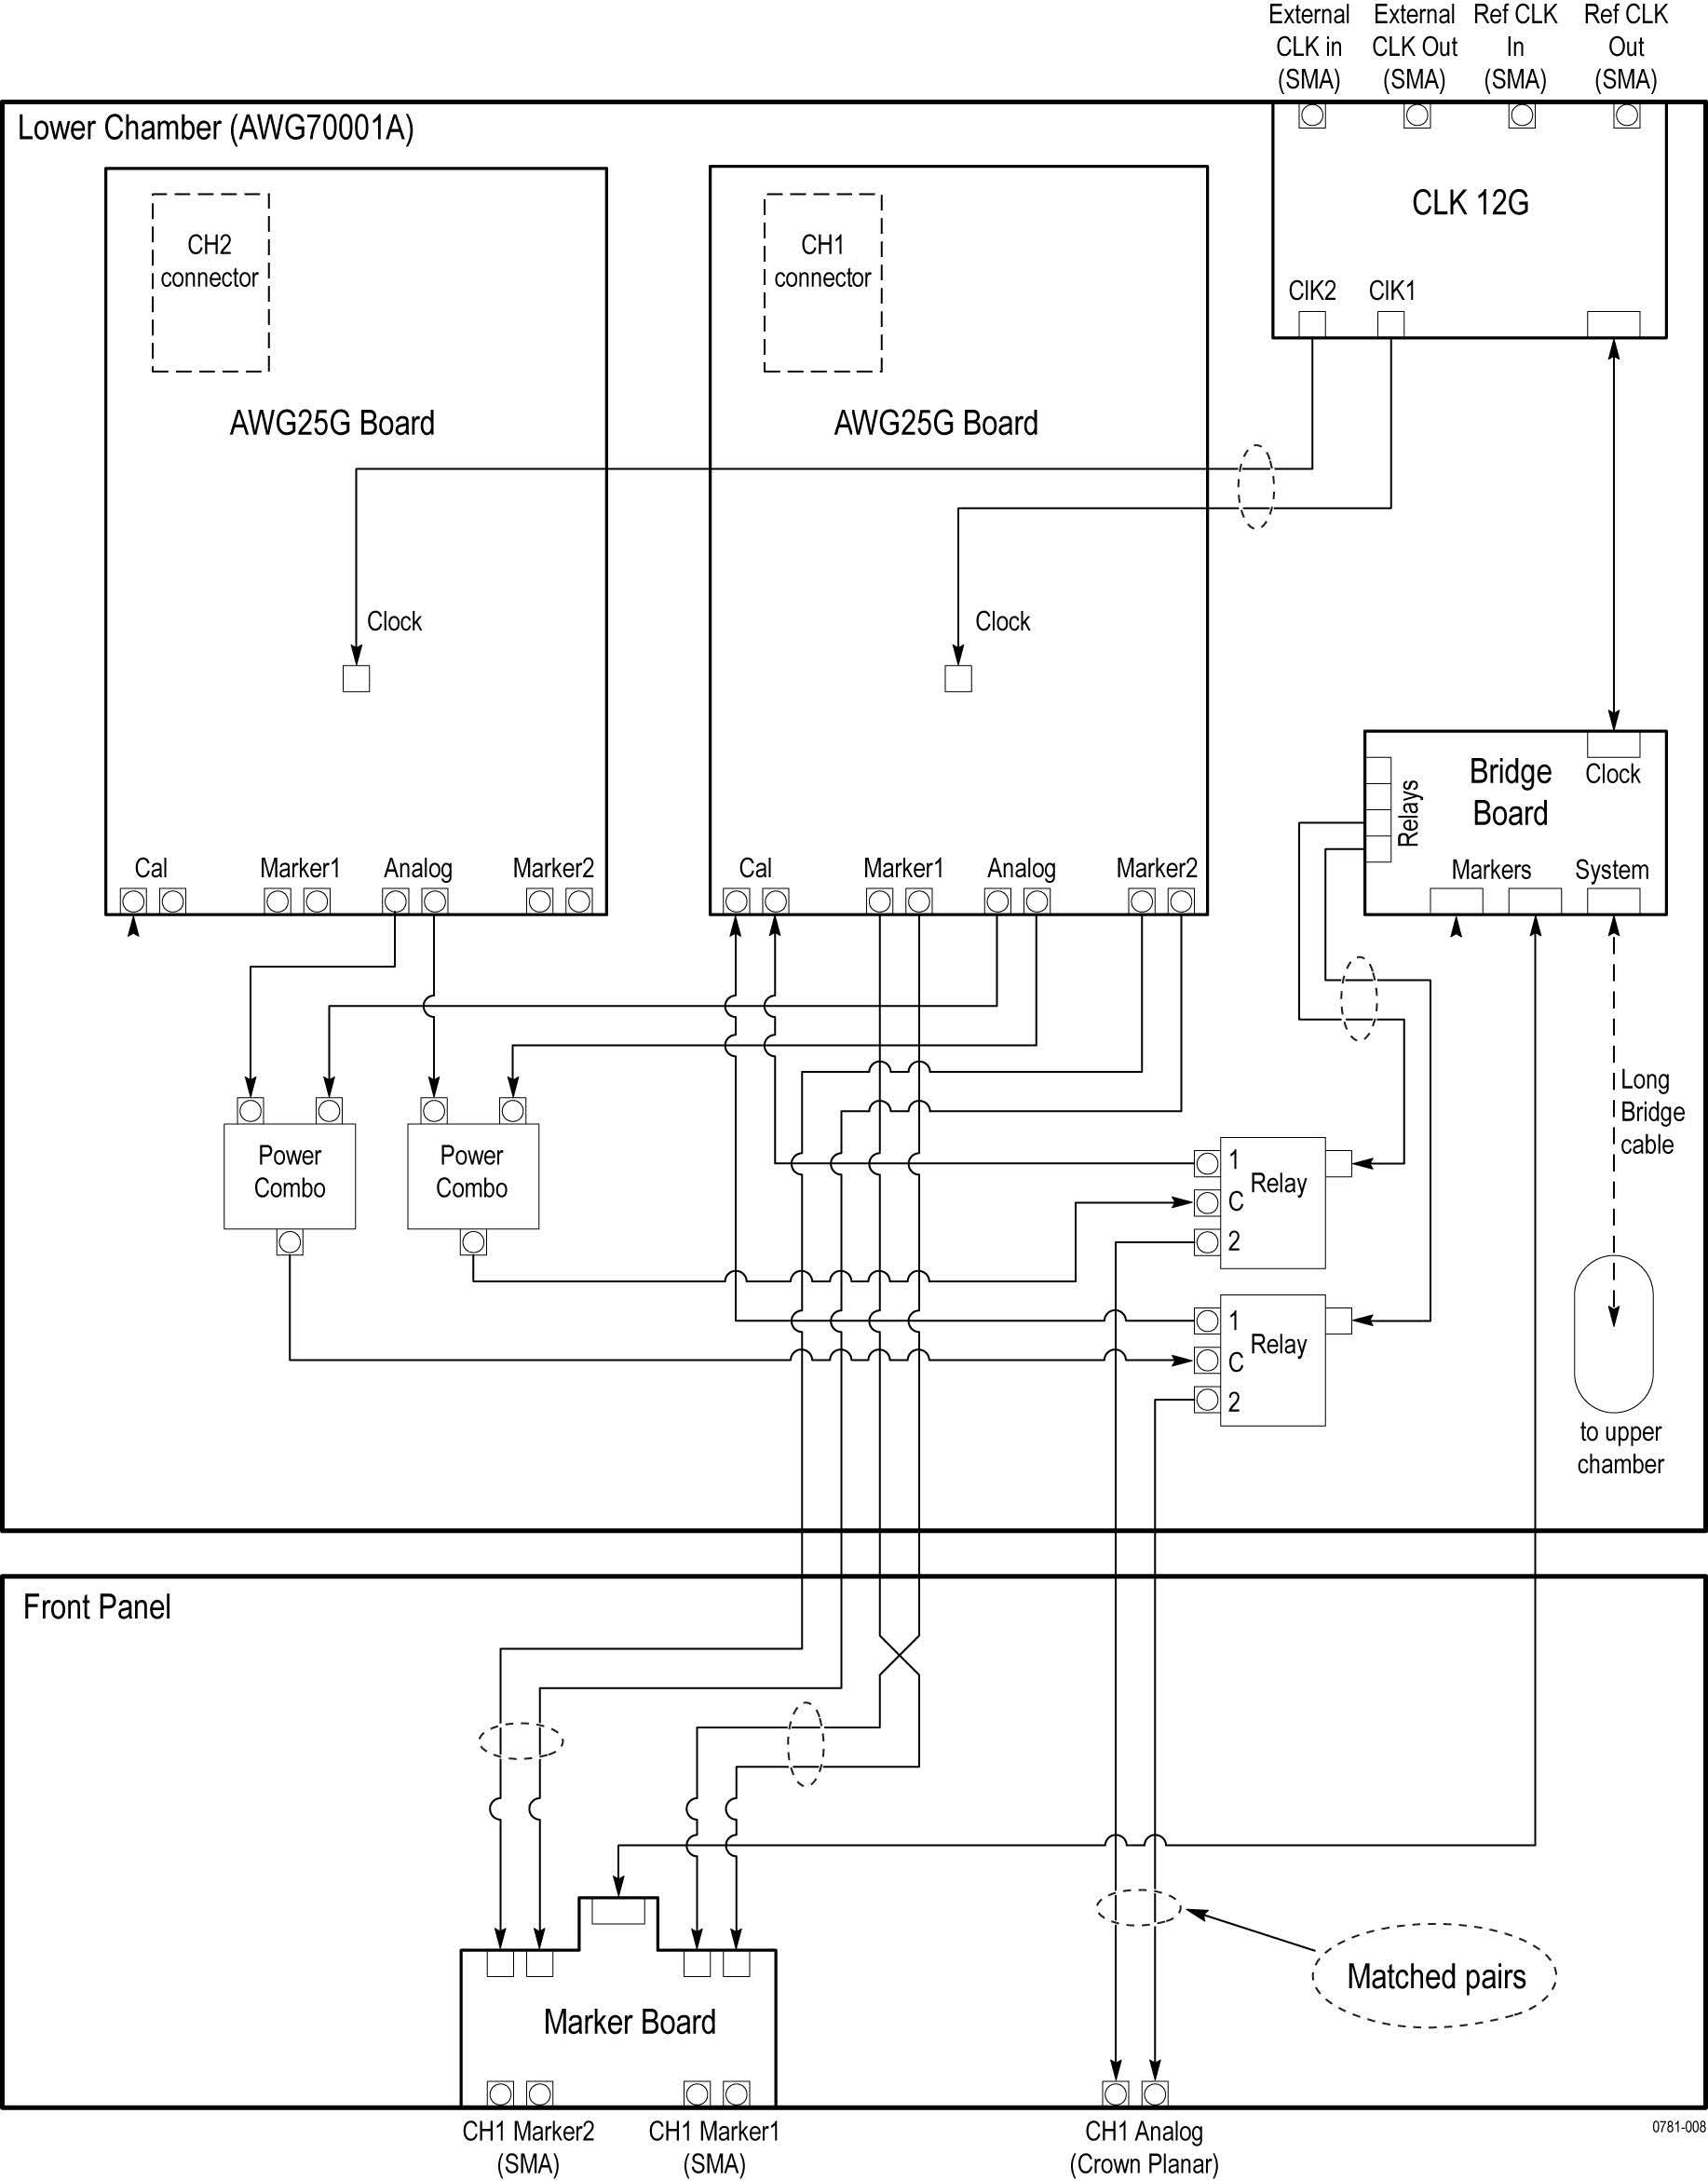
The AWG5200 Series Arbitrary Waveform Generators provide various models with different sample rates and numbers of channels. Each model consists of two major sections: the platform and generator. The platform components are located in the Upper chamber and Display chamber of the mechanical chassis. These are common to each model. The generator components are in the Lower chamber and are different for each model.
System block diagram
The Arbitrary Waveform Generator platform is based on the COM-Express CPU board and components for a PC. The instrument operates with the Microsoft Windows operating system. The following figures show the system-level block diagrams.
Maintenance
Introduction
This section contains information for technicians to service some parts of the AWG5200 Arbitrary Waveform Generators. If further service is required, send the instrument to a Tektronix Service Center.
Service prerequisites
- Procedures in this manual must be performed by a qualified service person.
- Read the General safety summary and the Service safety summary at the beginning of this manual. (See Service_Safety.html#GUID-9AD122D7-197C-4355-A630-AAD15BC36851) and (See Service safety summary).
- When using this manual for servicing, follow all warnings, cautions, and notes.
- Remove and replace procedures describe how to install or remove a replaceable module.
Performance check interval
Generally, the performance check described in the Specifications and Performance Verification Technical Reference document should be done every 12 months. In addition, a performance check is recommended after repair.
If the instrument does not meet performance criteria, as shown in the Specifications and Performance Verification Technical Reference document, repair is necessary.
Electrostatic damage prevention
This instrument contains electrical components that are susceptible to damage from electrostatic discharge. Static voltages of 1 kV to 30 kV are common in unprotected environments.
 | CAUTION:Static discharge can damage any semiconductor component in this instrument. |
- Minimize handling of static-sensitive components.
- Transport and store static-sensitive components or assemblies in their original containers, on a metal rail, or on conductive foam. Label any package that contains static-sensitive assemblies or components.
- Discharge the static voltage from your body by wearing a wrist strap while handling these components. Servicing static-sensitive assemblies or components should only be performed at a static-free workstation by qualified personnel.
- Nothing capable of generating or holding a static charge should be allowed on the workstation surface.
- Keep the component leads shorted together whenever possible.
- Pick up components by the body, never by the leads.
- Do not slide the components over any surface.
- Avoid handling components in areas that have a floor or work surface covering capable of generating a static charge.
- Do not remove the circuit board assembly from the mounting plate. The mounting plate is an important stiffener, which prevents damage to surface-mount components.
- Use a soldering iron that is connected to earth ground.
- Use only special antistatic, suction-type or wick-type desoldering tools.
 | Note:A lead-free solder such as SAC 305 is recommended for making repairs in this instrument. Cleaning of rosin residue is not recommended. Most cleaning solvents tend to reactivate the rosin and spread it under components where it may cause corrosion under humid conditions. The rosin residue, if left alone, does not exhibit these corrosive properties. |
Inspection and cleaning
This section describes how to inspect for dirt and damage and how to clean the exterior of the instrument.
The instrument cover helps keep dust out of the instrument, and is needed to meet EMI and cooling requirements. The cover should be in place when the instrument is in operation.
Inspection and cleaning, when performed regularly, may prevent the instrument from malfunctioning and enhance its reliability. Preventive maintenance consists of visually inspecting and cleaning the instrument and using general care when operating it. How often preventive maintenance should be performed depends on the severity of the environment in which the instrument is used. A proper time to perform preventive maintenance is just before making any product adjustments.
Inspect and clean the instrument as often as operating conditions require.
Exterior inspection
 | CAUTION:Do not use chemical cleaning agents that might damage the plastics used in this instrument. |
Inspect the outside of the instrument for damage, wear, and missing parts, using the following Table 1 as a guide. An instrument that appears to have been dropped or otherwise abused should be checked thoroughly to verify correct operation and performance. Immediately repair defects that could cause personal injury or lead to further damage to the instrument.
| Item | Inspect for | Repair action |
|---|---|---|
| Cabinet, front panel, and cover | Cracks, scratches, deformations, damaged hardware or gaskets | Send the instrument to Tektronix for service. |
| Front-panel buttons | Missing or damaged buttons | Send the instrument to Tektronix for service. |
| Connectors | Broken shells, cracked insulation, or deformed contacts. Dirt in connectors | Send the instrument to Tektronix for service. |
| Carrying handle and cabinet feet | Correct operation. In this manual, procedures refer to "front," "rear," "top," etc. of the instrument | Repair or replace defective handle/feet |
| Accessories | Missing items or parts of items, bent pins, broken or frayed cables, or damaged connectors | Repair or replace damaged or missing items, frayed cables, and defective modules |
Exterior cleaning
- Blow off dust through instrument vents with dry, low-pressure, deionized air (approximately 9 psi).
- Remove loose dust on the outside of the instrument with a lint-free cloth.
 CAUTION:To prevent getting moisture inside the instrument during external cleaning, use only enough liquid to dampen the cloth or applicator.
 - Remove remaining dirt with a lint-free cloth dampened in a general-purpose detergent and water solution. Do not use abrasive cleaners.
Lubrication
There is no periodic lubrication required for this instrument.
Remove and replace
This section contains procedures for removal and installation of customer-replaceable modules in the AWG5200 series generator. All parts listed in the Replaceable Parts section of this manual is a module.
Preparation
 | WARNING:Before performing this or any other procedure in this manual, read the General safety summary and the Service safety summary at the beginning of this manual. Also, to prevent possible damage to the components, read the information on preventing ESD in this section. |
- List of equipment required to remove and disassemble modules
- Module locator diagram for finding the replaceable modules
- Interconnect instructions
- Procedures for removal and reinstallation of instrument modules
 | WARNING:Before removing or replacing any module, disconnect the power cord from the line voltage source. Failure to do so could cause serious injury or death. |
Required equipment
| Name | Description |
|---|---|
| Torque driver | Accepts 1/4 inch screwdriver bits. Torque range of 5 in/lb. to 14 in/lb. |
| T10 TORX tip | TORX driver bit for T10 size screw heads |
| T20 TORX tip | TORX driver bit for T20 size screw heads |
| T25 TORX tip | TORX driver bit for T25 size screw heads |
Remove and replace procedures not requiring factory calibration
 | Note:Calibration is not required when you remove external assemblies, shown in this section. |
Rear-corner feet
- Stand the instrument on its handles, with the rear panel facing up.
- Remove the screw holding the foot, using a T25 tip.
- To replace the foot, align it carefully and hold it in alignment while installing the screw. Use a T25 tip and torque to 20 in-lbs.
Bottom feet
- Set the instrument on its top, with the bottom facing up.
- Remove the rubber plug that is installed in the bottom foot you are replacing.
- Remove the screw attaching the foot, and then remove the foot.
- To replace the foot, place it in position and install the screw, using a T-20 tip, and torque to 10 in-lbs.
Handles
- To remove the handles, place the instrument bottom on the work surface.
- Remove the three screws that attach the handle to the instrument as shown, and remove the handle.

- To replace the handles, position the handle on the instrument, lining up the holes in the handle with the posts on the instrument. Attach the handle with two T25 screws and torque to 20 in-lbs.
Side handle
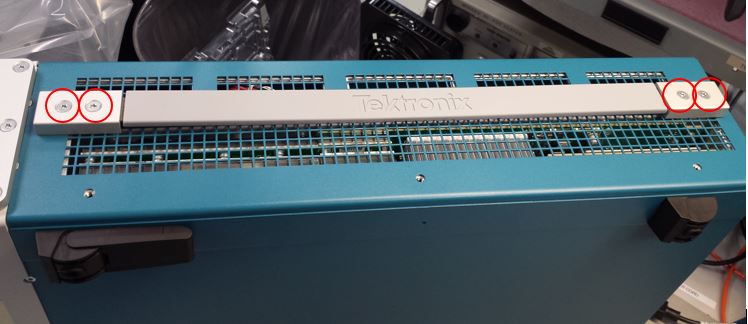
- Remove the four screws using T20 bit to remove the two handle top caps. While installation, torque to 20 in*lb with T20 bit.

- Remove the silicone handle from top of the spacers and remove the two spacers.
- To replace, reverse the procedure.
Encoder knob
 | Note:The encoder knob is a push-button knob. You must leave at least 0.050 inches of clearance between the back face of the knob and the front panel. |
- To remove the encoder knob, loosen the set screw. Do not remove the spacer and nut under the knob.
- To replace the encoder knob:
- Carefully align the encoder knob on the encoder post, on top of the spacer and nut.
- Ensure that there is at least 0.050” of clearance between the back face of the knob and the front panel to allow for push-button operation.
- Install and tighten the set screw. Do not overtighten.
Removable hard drive
- The hard drive is mounted to a hard drive sled located on the front panel. To remove the sled with hard drive, unscrew the two thumbscrews on the front panel (labeled REMOVABLE HARD DRIVE) and slide the hard drive sled out of the instrument.
- To replace, reverse the procedure.
Software upgrades
Software upgrades, as available, are located at www.tektronix.com/downloads.
Calibration
 | CAUTION:The AWG5200 series has a calibration utility, which does not require any external signals or equipment. This self-cal does not replace a full factory calibration by Tektronix. The full factory calibration must be performed after any procedure that opens the front panel or rear panel. Any measurements made after opening the front or rear panel, without performing the full factory calibration afterward, are invalid. |
Factory calibration
The factory calibration must be performed after any procedure module that opens the front panel or rear panel. This calibration can only be performed by Tektronix personnel. If the front panel or rear panel is opened, a full factory calibration must be performed by Tektronix.
Restore Factory calibration
If you run a self-cal and the results are bad, you can restore the factory cal constants by clicking RESTORE FACTORY CAL in the Calibration window.
Self-calibration
- If your application requires optimum performance, you should run the self-calibration utility before performing critical tests if there are temperature is more than 5 °C above or below the temperature at which the calibration was last run. You must run the complete self-cal. It takes about 10 minutes. If you abort, it won’t write any new cal constants.
- Always start a self-cal by doing the Calibration initialization. It is a hardware reset; it prepares for calibration.
- LOOP: you can loop the calibration, but it never saves the constants. Loop can help find intermittent problems.
- The screen turns pink when there is an error or failure.
Run self-calibration
- No external signals or equipment is necessary. Allow the instrument to run for at least 20 minutes under the environmental conditions in which it will operate after calibration. Ensure that the instrument’s internal temperature has stabilized.
- Open the Calibration window:
- Select the Utilities workspace tab.
- Select the Diag & Cal button.
- Select the Diagnostics & Calibration button.
- Select the Calibration button, then the Calibration check box to select all self-calibrations, and change the Log options as desired. All available tests and adjustments are selected now.
- Click Start to begin the calibration. The Start button changes to Abort while the calibration is in process.
- During calibration, you can click the Abort button to stop the calibration and revert to the previous calibration data. If you do so, no calibration constants will be saved.
- If you allow the calibration to complete, and there are no errors, the new calibration data is applied and saved. The pass/fail result is shown in the right panel of the Calibration page, and contains the associated date, time, and temperature information.
- Calibration data is automatically stored in non-volatile memory. If you don’t want to use the calibration data from the most recent self-calibration, click the Restore factory cal button. This loads the original calibration data shipped with the instrument.
Diagnostics
This section contains information designed to help troubleshoot the AWG5200 series instruments to the module level. Component-level repair is not supported.
Use the instrument diagnostics to help troubleshoot these instruments.
 | Note:The diagnostics are available during normal start-up of the AWG5200 Series application. |
Back up data
Before running any diagnostics or calibrations on a unit, copy C:\ProgramData\Tektronix\AWG\AWG5200\Logs to a another location.
Review this data with an XML editor or Excel spreadsheet to locate the errors. Then when you run diagnostics or calibrations, you can compare current and previous instrument behavior.
Saving the persistence file
Before you start troubleshooting, use Microsoft Windows Explorer to back up the persistence file to a safe service copy location. After service is complete, restore the persistence file. The persistence file location is C:\ProgramData\Tektronix\AWG\AWG5200\persist.xml.
resultStatistics log file
The resultStatistics log file is a good starting point when diagnosing a reported problem. This file contains the instrument’s identification data and includes which tests were run and results.
This is an .xml file and the best way to view the file is as follows:- Open a blank Excel spreadsheet.
- Click on the Data tab.
- Click Get Data and then select File > From XML.
- Navigate to
C:\ProgramData\Tektronix\AWG\AWG5200\resultStatistics.xmland import the data.
Diagnostics overview
The instrument runs some self-tests at start-up. These are the POST tests.
The POST tests check connectivity between the boards and also check that the power is within the required range, and that the clocks are functional. You can also choose to run the POST tests at any time, by selecting POST Only in the Diagnostics window.
If there is an error, the instrument automatically goes into diagnostics.
- Board level (such as System)
- Area to be tested (such as System Board)
- Feature to be tested (such as Communications)
- Actual tests
Using the Log directory
You can use Microsoft Windows Explorer to copy the log files from: C:\ProgramData\Tektronix\AWG\AWG5200\Logs to a safe service copy location. This can be done without the application running.
This directory contains XML files, which show statistics about the instrument diagnostics that have been run. Files that you want to look at are those starting with result, such as resultHistory (raw data from the log at the bottom of the screen when you are running diagnostics) and calResultHistory (raw data from the log at the bottom of the screen when you are running calibration), and calResultStatistics.
Copy the diagnostic logs from the AWG onto your computer, where you can use an XML editor to view the logs. To import the logs into an Excel spreadsheet, use the import commands in Excel, for example: Data->From Other Sources ->From XML Data Import (choose file to open with *Statistics in name).
Files and utilities
System. When you select the About my AWG button under Utilities, the first screen shows information such as the installed options, instrument serial number, software version, and PLD versions.
Preferences. Check to be sure that the problem is not caused by something being disabled, such as the display, security (USB), or error messages. The error messages appear in the lower left part of the screen, so if they do not appear, they might be disabled. Status also appears in the lower left of the screen.
Diagnostics & Calibration window
When you select the Utilities> Diag & Cal>Diagnostics & Calibration, you open a window where you can run the Self Calibration or Diagnostics. The screen shows the last time that calibration ran and the internal temperature of the instrument when calibration ran. If the temperature is out of range, a message alerts you to rerun the self calibration. For information on the self calibration, see the section on Calibration. This is not the same as a full factory calibration.
Error log
When you select Diagnostics, you can select one or more diagnostics groups to run, then select Start to run. When the tests are complete, the log will appear in the bottom part of the screen.
You can set the log to show All results or Failures only. If All results is selected, a log file will always be generated. If Failures only is selected, a log file will only be generated if a selected test fails.
Checking Show Failure Info provides more information about the failed test.
 | Note:Optimum settings for troubleshooting is to select Failures only and check Show failure details. |
Click Copy text to make a text file of the log, which you can copy into a Word file or spreadsheet. The error log tells when the instrument passed a test, when it failed, and other pertinent failure data. This does not copy the contents of the log file. Access the log files and read their contents. (See Using the Log directory)
When you close the Diagnostics window, the instrument goes to the previous state, after running a brief hardware initialization. The previous state is restored, with the exception that waveforms and sequences are not stored in memory; they will have to be reloaded.
Repackaging instructions
- Attach a tag to the instrument showing: the owner, complete address and phone number of someone at your firm who can be contacted, the instrument serial number, and a description of the required service.
- Package the instrument in the original packaging materials. If the original packaging materials are not available, follow these directions:
- Obtain a carton of corrugated cardboard, having inside dimensions six or more inches greater than the dimensions of the instrument. Use a shipping carton that has a test strength of at least 50 pounds (23 kg).
- Surround the module with a protective (anti-static) bag.
- Pack dunnage or urethane foam between the instrument and the carton. If you are using Styrofoam kernels, overfill the box and compress the kernels by closing the lid. There should be three inches of tightly packed cushioning on all side of the instrument.
- Seal the carton with shipping tape, industrial stapler, or both.
Parts ordering information
Use the lists in the appropriate section to identify and order replacement parts for your product. Replacement parts are available through your local Tektronix field office or representative.
Standard accessories for these products are listed in your user manual. The user manual is available at www.tek.com/manuals.
Changes to Tektronix products are sometimes made to accommodate improved components as they become available and to give you the benefit of the latest improvements. Therefore, when ordering parts, it is important to include the following information in your order:
-
Part number
-
Instrument type or model number
-
Instrument serial number
-
Instrument modification number, if applicable
If you order a part that has been replaced with a different or improved part, your local Tektronix field office or representative will contact you concerning any change in part number.
Module servicing
Modules can be serviced by selecting one of the following three options. Contact your local Tektronix Service Center or representative for repair assistance.
Module exchange. In some cases, you may exchange your module for a remanufactured module. These modules cost significantly less than new modules and meet the same factory specifications. For more information about the module exchange program, call 1-800-833-9200. Outside North America, contact a Tektronix sales office or distributor; see the Tektronix Web site (www.tek.com) for a list of offices.
Module repair and return. You may ship your module to us for repair, after which we will return it to you.
New modules. You may purchase replacement modules in the same way as other replacement parts.
Abbreviations
Abbreviations conform to American National Standard ANSI Y1.1-1972.
Using the replaceable parts list
This section contains a list of the replaceable mechanical and/or electrical components. Use this list to identify and order replacement parts. The following table describes each column in the parts list.
Parts list column descriptions
| Column | Column name | Description |
|---|---|---|
| 1 | Figure & index number | Items in this section are referenced by figure and index numbers to the exploded view illustrations that follow. |
| 2 | Tektronix part number | Use this part number when ordering replacement parts from Tektronix. |
| 3 and 4 | Serial number | Column three indicates the serial number at which the part was first effective. Column four indicates the serial number at which the part was discontinued. No entry indicates the part is good for all serial numbers. |
| 5 | Qty | This indicates the quantity of parts used. |
| 6 | Name & description | An item name is separated from the description by a colon (:). Because of space limitations, an item name may sometimes appear as incomplete. Use the U.S. Federal Catalog handbook H6-1 for further item name identification. |
Replaceable parts – external
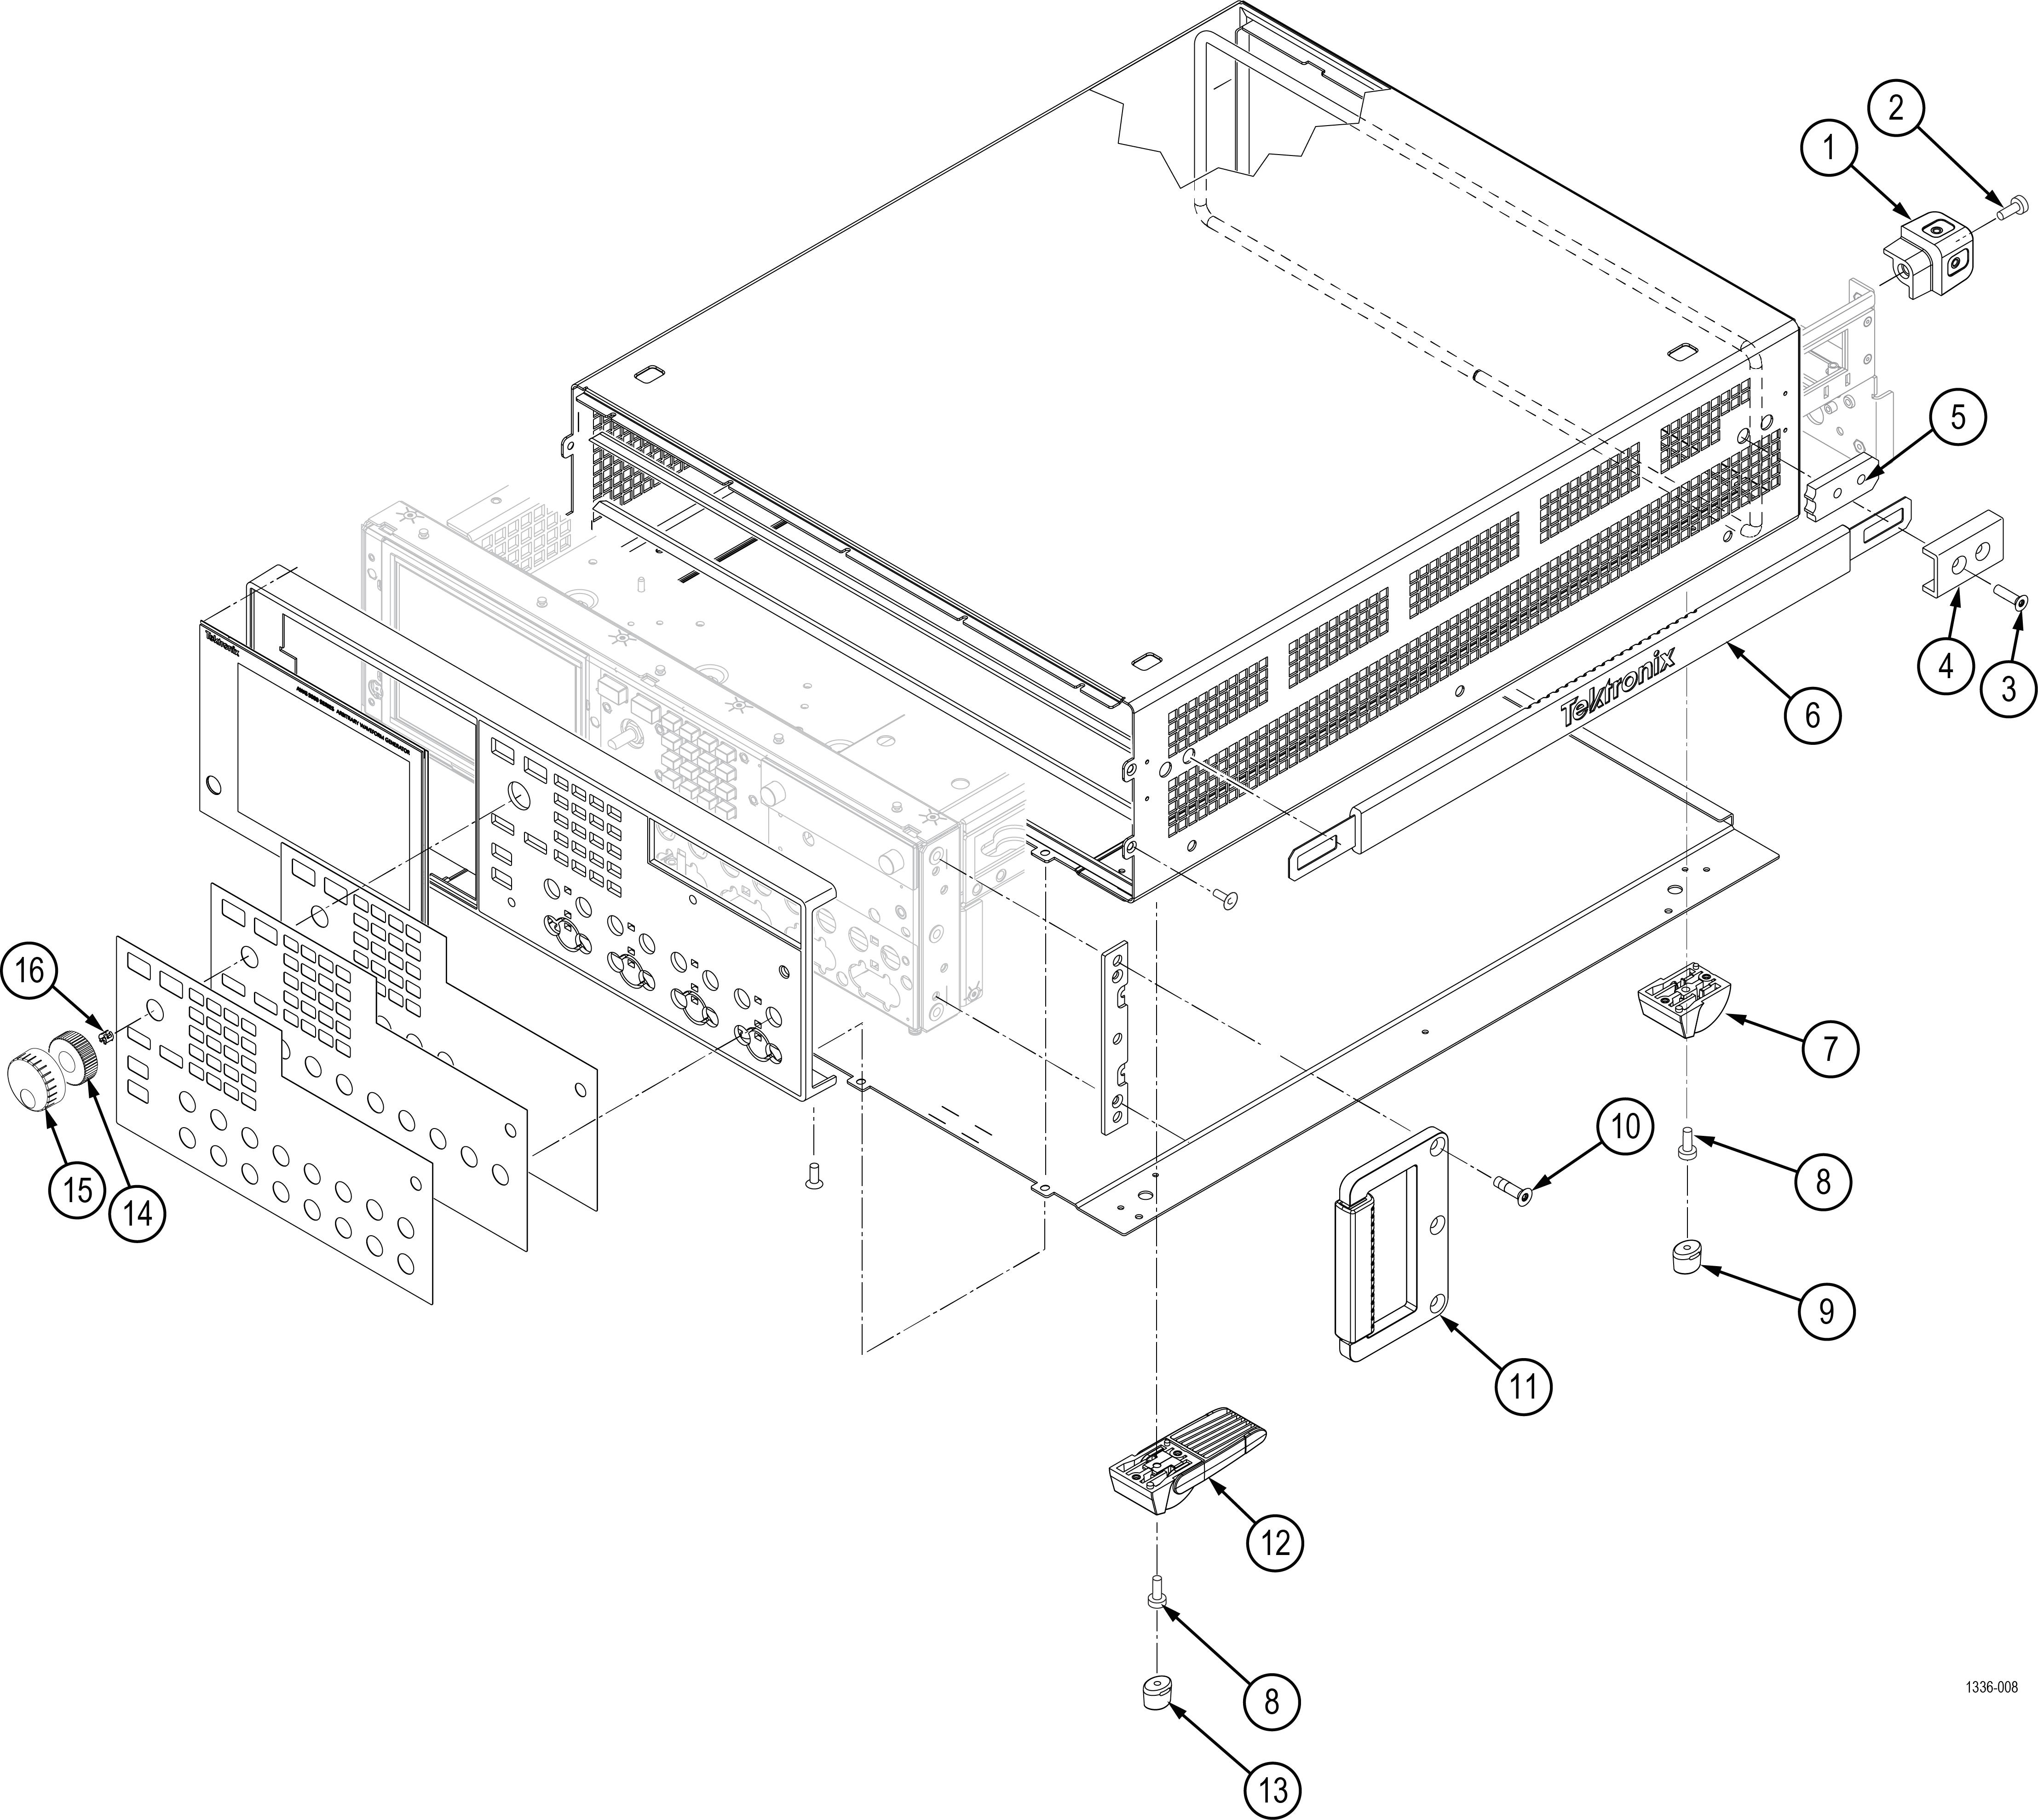
| Index number | Tektronix part number | Serial no. effective | Serial no. discont'd | Qty | Name & description |
|---|---|---|---|---|---|
| Refer to Figure 1 | |||||
| 1 | 348-2037-XX | 4 | FOOT, REAR, CORNER, SAFETY CONTROLLED | ||
| 2 | 211-1481-XX | 4 | SCREW, MACHINE, 10-32X.500 PANHEAD T25, WITH BLUE NYLOK PATCH | ||
| 3 | 211-1645-XX | 2 | SCREW, MACHINE, 10-32X.750 FLATHEAD, 82 DEG, TORX 20, WITH THREAD LOCKING PATCH | ||
| 4 | 407-5991-XX | 2 | HANDLE, SIDE, TOP CAP | ||
| 5 | 407-5992-XX | 2 | SPACER, HANDLE, SIDE | ||
| 6 | 367-0603-XX | 1 | OVERMOLD ASSY, HANDLE, SIDE, SAFETY CONTROLLED | ||
| 7 | 348-1948-XX | 2 | FOOT, STATIONARY, NYLON W/30% GLASS FILL, SAFETY CONTROLLED | ||
| 8 | 211-1459-XX | 8 | SCREW, MACHINE, 8-32X.312 PANHEAD T20, WITH BLUE NYLOK PATCH | ||
| 9 | 348-2199-XX | 4 | CUSHION, FOOT; SANTOPRENE, (4) BLACK 101-80) | ||
| 10 | 211-1645-XX | 6 | SCREW, MACHINE, 10-32X.750 FLATHEAD, 82 DEG, TORX 20, WITH THREAD LOCKING PATCH | ||
| 11 | 367-0599-XX | 2 | HANDLE ASSY, BASE AND GRIP, SAFETY CONTROLLED | ||
| 12 | 348-1950-XX | 2 | FOOT ASSEMBLY, FLIP, SAFETY CONTROLLED | ||
| 13 | 348-2199-XX | 4 | CUSHION; FOOT, STACKING | ||
| 14 | 377-0628-XX | 1 | KNOB, WEIGHTED INSERT | ||
| 15 | 366-0930-XX | 1 | KNOB, ASSY | ||
| 16 | 214-5089-XX | 1 | SPRING;KNOB RETAINER | ||
Help us improve our technical documentation. Provide feedback on our TekTalk documentation forum.


