This application note describes three different approaches to synchronizing multiple oscilloscopes to measure more channels than are supported on any single instrument.
In this application note you will learn:
- Things to consider when synchronizing oscilloscopes
- Contributors to timing error between oscilloscopes
- Three configurations with advantages and disadvantages
- Setting up multi-oscilloscope software
This application note uses the interface and specifications of Tektronix 5 and 6 Series MSOs to illustrate the procedures and principles of multi-oscilloscope synchronization. The 5 and 6 Series MSOs are also available in 2 rack-unit, low-profile models designed for high channel-count systems. However, many of the principles are generic and may be applied to other oscilloscopes with adjustments to suit the relevant software and datasheet specifications.
Why more than 8 channels?
When building a test system, one may need to measure more signals than a single oscilloscope can capture with its available channels. A common approach to increase the number of oscilloscope channels available in a test system is to combine multiple oscilloscopes. Applications for multichannel measurement can include the capture of complex particle physics experiments, the measurement of many power rails and analysis of 3-phase power converters. Measurements can include crosstalk from a power supply showing up in a serial bus, analyzing RF interference and confirming that I/O signals are arriving intact. In multi-channel application or measurement scenarios, it is important to maintain precise synchronization between channels in order to accurately analyze the timing relationships of the entire system under test.
Considerations for multi-oscilloscope measurements
Software
For multi-oscilloscope systems, software can play a number of critical roles. At the most basic level it must facilitate the process of combining data from more than one instrument. In most cases software establishes trigger and acquisition settings for the instruments. It may also provide display and analysis capabilities for the combined waveforms. It can also help with the deskew process. Custom software may be written to accomplish these tasks, however TekScope PC Analysis software can serve these functions and is available off the shelf. TekScope PC software will be used for multioscilloscope control and acquisition in this application note and using the software is covered in a later section.
System configuration
When considering the synchronization approach for your test system, it is important to understand the various synchronization strategies and the amount of timing error one can tolerate between channels. Different approaches to cabling, triggering and delay compensation can have significant impacts on timing errors. Differences in channel delays internal to the oscilloscope and external (ie, cabling and probes), cause timing errors, or “skew”, between the channels. Before deciding on a synchronization strategy, it is important to answer some questions. How much skew can the test system tolerate across the input channels? Do all input channels need a tight skew tolerance or just some of them? For example, for making measurements on electromechanical or human to machine applications, a few tenths of a millisecond may be tolerable. However, measurements on high-speed electronic systems may require much tighter synchronization.
In order to better understand the tradeoffs in configuring a solution, it helps to understand the sources of timing error in a multi-instrument system.
Sources of timing errors
To better understand sources of timing errors, one can break them into four types:
- Trigger jitter
Trigger jitter is an acquisition-by-acquisition change in timing error. It can be seen by observing a signal that is synchronous to the trigger and setting the scope display to infinite persistence. This can be seen in the difference between Figures 1a and 1c. Using a 5 or 6 Series MSO input channel with either an external trigger source or a probe will result in jitter of less than 10 ps. Using the Aux trigger input can add more than 200 ps of jitter. - Skew between channels of the oscilloscope
5 and 6 Series MSO specifications state that the delay between analog channels when using probes will be less than 100 ps. - Skew from cable propagation delay of an external trigger or probe for each scope
When using an external trigger and a splitter, any differences in cable lengths will result in skew. This will be approximately 70 ps per centimeter. If using identical analog probes on each oscilloscope as a trigger source, this should be less than 100 ps. This can be seen in Figure 1b. - Skew between the trigger event and the Aux trigger out signal
If we assign the Aux output of a triggered oscilloscope as a trigger out signal, there is an inherent skew of 1 µs. This is probably too large for most applications if not corrected. Pre-trigger delay can be used for correction if the record length is long enough. This can be seen in right side of Figure 2.


1. A low-skew synchronization approach using an external source
The most accurate synchronization techniques use a single trigger source that feeds multiple oscilloscopes by splitting the trigger signal with a power splitter (BNC or SMA) that feeds the same signal into all the instruments, as shown in Figure 3. The cables from a splitter to all instruments need to be the same and of equal lengths (optimally, using phased matched cabling) as this reduces skew caused by different propagation delays. By maintaining the same propagation delays on the cabling and splitters, the instruments have the best chance to achieve a synchronous trigger condition that most closely represents the channel-to-channel timing of a single oscilloscope.

Splitter details
To maintain good trigger signal integrity, use a high-quality power splitter. This functions as a balanced voltage divider, connecting the 50 Ω trigger source to 50 Ω cables which attach to a 50 Ω input of the oscilloscope. The splitter (shown in Figure 4) will divide the voltage 4 ways, so a 5 V peak trigger will supply 1.25 V to each leg. Be aware of your splitter specifications and the trigger signal requirement. For example, a signal greater than 500 mV is optimal to drive the auxiliary trigger input of a 5 or 6 Series MSO. The oscilloscope’s trigger system responds better and has better stability when larger trigger signals are supplied, and this will deliver better skew results.

Illustrated in Figures 3 and 4 are recommended synchronization accessories available from Tektronix: an SMA high-bandwidth 4-way power splitter (Tektronix part number 174-6214-00) and 4 ea. matched pair SMA cables (Tektronix part number 174-6212-00). The cables shown are matched to within ps to control skew.
Synchronizing the reference clocks
It is important to lock the samplers on oscilloscopes via the high-fidelity 10 MHz reference clock. This eliminates longterm drift effects between timebases, minimizing delta time accuracy errors in measurements between channels that span large acquisitions (>2 ms). There are two methods used to synchronize reference clocks:
- The best method is to use a high stability external clock and use a splitter to feed each reference clock input. This is similar to the approach used for splitting triggers and is shown in Figures 3 and 4.
- Another method is to use the internal reference clock of one oscilloscope and feed it to the next scope, as shown in Figure 5. In turn the Aux Out of that scope may feed the Ref In of the next scope in line, and so on. This may be adequate if the internal reference timebase accuracy meets the requirements.
In either case, on instruments receiving the 10 MHz reference clock, the reference clock source should be set to External. This setting may be found by double tapping the Acquisition badge on the 5 or 6 Series MSO, as shown on the left side of Figure 6. Once the transmitting and receiving oscilloscopes are configured and synchronized, the Timebase Reference Source should show a green "Locked" indication.
On the instrument transmitting the reference clock, the reference clock must be designated as the output on the Aux Output by going into the Utility menu à Aux Out à select Reference Clock, as shown in the right side of Figure 6.


2. A probe-based synchronization approach
If no external trigger source is available, or not appropriate for the trigger requirements, it is reasonable to probe the same trigger source on each oscilloscope to achieve synchronization. You will achieve excellent timing but it will require sacrificing one channel on each scope. The skew caused by the difference in propagation delay will be well within the range of the scope’s deskew settings. Using an active probe such as the Tektronix TAP4000 will achieve low overall skew. This probe can achieve a pulse rise time less than 115 ps. This is excellent for low trigger jitter. In addition, the TAP4000 probe has input capacitance as low as 0.8 pf. This capacitance is additive for each probe, and the circuit will need to be able to handle this additional loading. Finally, the overall propagation delay is 5.3 ns, so the difference between probes will be well within the 125 ns deskew range of the oscilloscope channel input.
To implement the probe-based synchronization method between two scopes (Figure 7), add an oscilloscope probe (preferably a TAP4000) to a channel of each scope. Probe the same signal with both probes using the same type of probe tip, with identical length, on each probe. The trigger signal being probed should have a relatively fast (50–100 psec) rise time. On the scopes, enable a simple edge trigger with the trigger level set to mid-scale on each scope. Note that any differences in the trigger level will add skew. Depending on the trigger source, it should be possible to achieve an overall skew in the ten’s of picoseconds with this approach.

3. A simplified synchronization approach for applications with less stringent timing requirements
If a multi-oscilloscope system does not require extremely low skew, this allows for additional flexibility in the setup.

In the setup shown in Figure 8, one uses the aux trigger out from the master oscilloscope to feed the other scopes through a splitter. In the 5 or 6 Series MSO, there is a nominal 900 ns skew between a trigger event and the Aux Out signal. Using a splitter and matched cables minimizes any additional skew to the remaining scopes. If the record length is long enough, a trigger delay setting in the horizontal badge settings can be used to correct for the skew between the trigger and Aux Out. This is shown in Figure 9. This configuration has the advantage of allowing any channel on the master scope to be used as a trigger source.

Using TekScope PC – A multi-scope client and deskew tool

TekScope™ PC Analysis Software is an application available from Tektronix that is well-suited for multi-oscilloscope configurations. It operates identically to the 4/5/6 Series MSO user interface but runs remotely on a Windows PC. One can connect to multiple scopes and display all the waveforms on a single oscilloscope display using TekScope. The display gets crowded, so a larger, high-resolution display is recommended. The same measurements are available as if you were running on a single scope. It is also capable of saving all the data from all the connected scopes in a single file.
TekScope PC is best suited for single shot multi-scope applications in which the trigger event occurs a the device under test (DUT). Data transfer intensive applications that rely on continuous acquisitions are not recommended, due to PC processing times.
Configuring TekScope PC for multi-scope applications
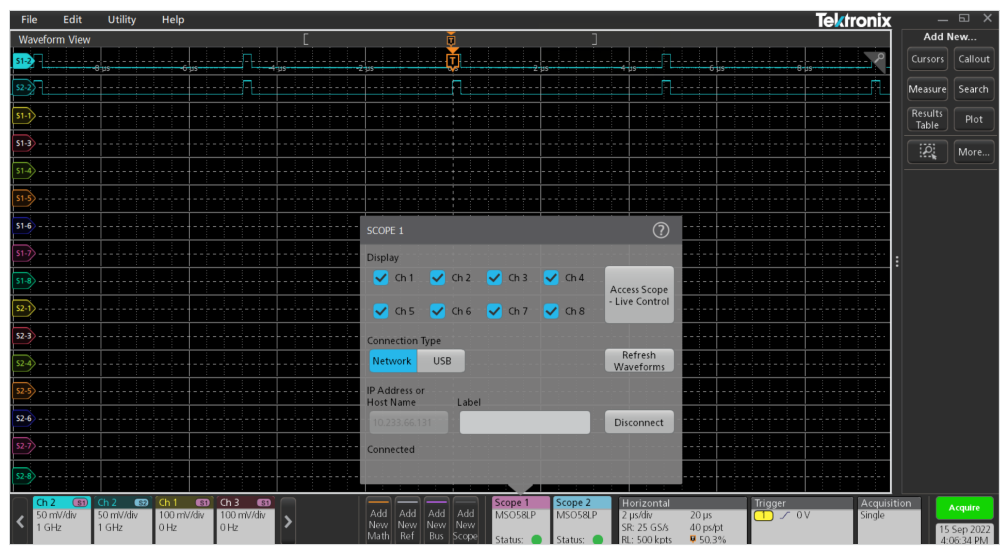
Connecting to a 5 or 6 Series MSO oscilloscope is simple. Click the Add New Scope badge and a New Scope is added. Double click the scope badge, enter the IP address, and connect, as shown in Figure 11. If remote commands are enabled, the horizontal settings will be applied to all connected scopes.

Deskewing a multi-scope system using TekScope
The deskew process involves measuring and removing the delta time between channels from different scopes.
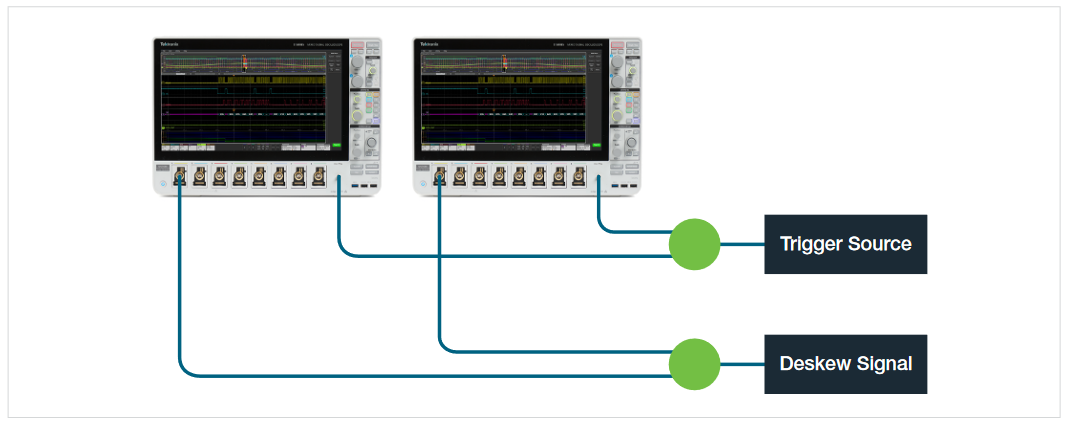
A clock signal that is not the trigger signal needs to be applied to the two channels being deskewed, as shown in Figure 13. This signal should have a fast rise time (e.g., 50 ps). Connect to two scopes at a time using TekScope PC. Pick one channel as the reference, as shown in Figure 14.
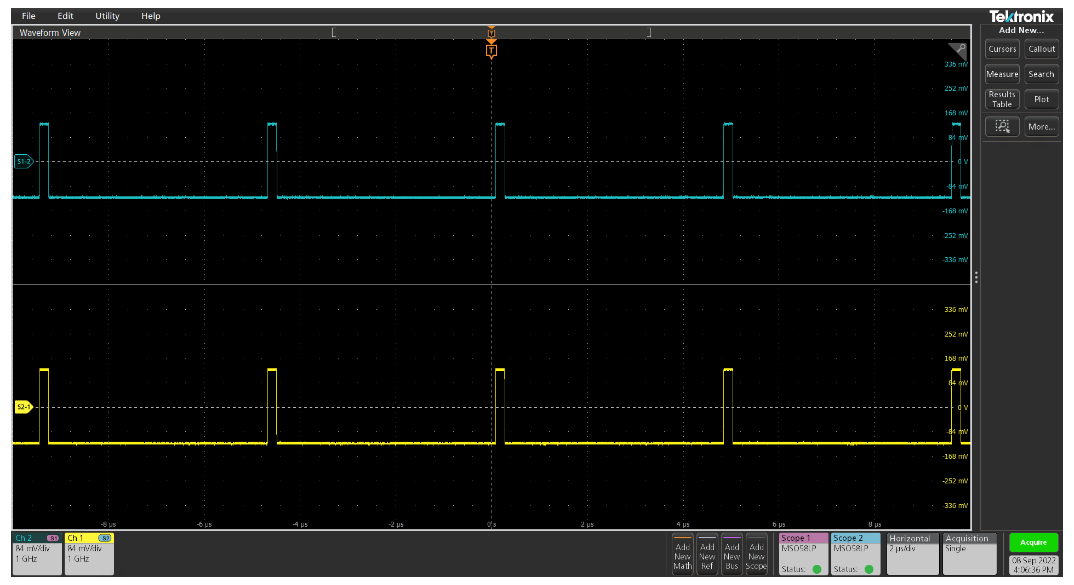
The next step is to overlay the two scopes as shown in Figure 15. Then, zoom into a leading edge of the signal so you can use markers to measure the delta time as shown in Figure 16.
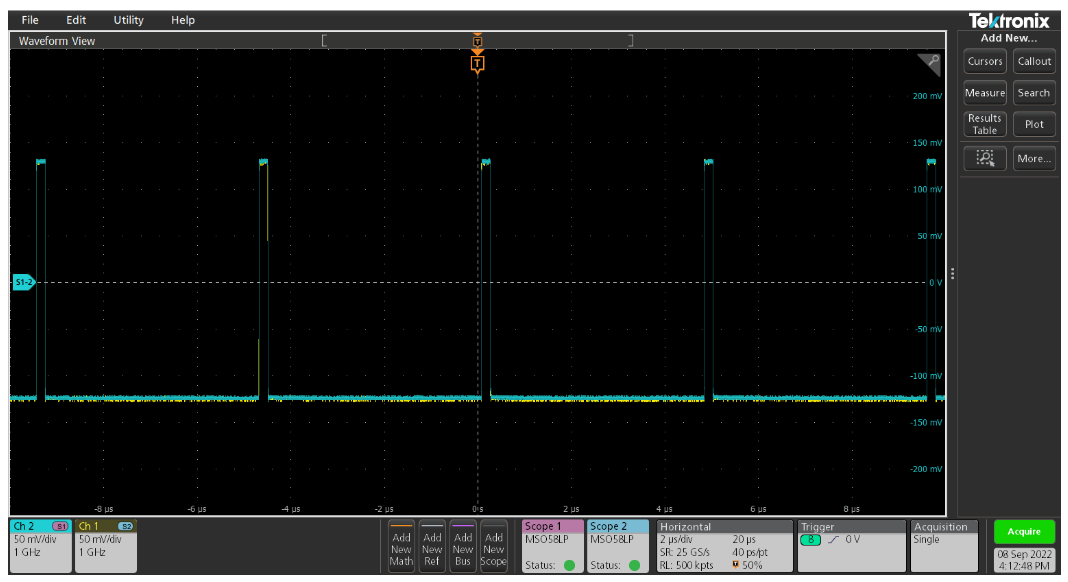
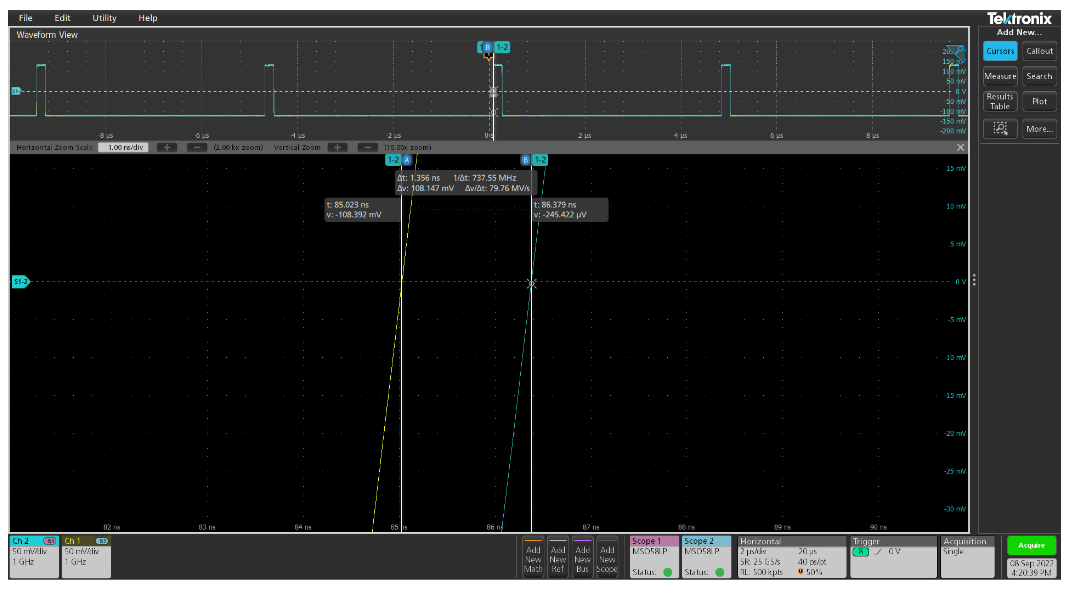
Now the delta time needs to be removed. Double click the vertical badge of the channel that is not the reference. Enter the measured delta time in the Deskew setting. The channel is deskewed as shown in Figure 17. This must be repeated for all channels.

Summary
When the synchronized capture of many signals is important, there are several options available to synchronize oscilloscopes. This technical brief illustrates three methods to synchronize a multi-scope measurement system using 5 and 6 Series MSO oscilloscopes and TekScope PC analysis software.
Find more valuable resources at TEK.COM
Copyright © Tektronix. All rights reserved. Tektronix products are covered by U.S. and foreign patents, issued and pending. Information in this publication supersedes that in all previously published material. Specification and price change privileges reserved. TEKTRONIX and TEK are registered trademarks of Tektronix, Inc. All other trade names referenced are the service marks, trademarks or registered trademarks of their respective companies.
011023 48W-73974-0


